

You’ve stared down that razor-thin crack, haven’t you? Small nuts skitter out like they’re greased. Micro cams feel too bulky or unreliable in those parallel walls.
Trango ball nuts solve this. They’re tiny active protection pieces with a sliding steel ball on a ramp, often tipped with soft copper for bite. Pull the trigger to shrink it, insert, then release: the ball cams outward for a solid hold in spots nothing else touches.
Climbers pack them for clean runs in pin scars and tight seams. No hammering needed; they slip in quietly and grab hard. Plus, they’re light at 30 to 70 grams each, so they won’t weigh down your rack.
In this post, you’ll learn exactly how they work, the cracks where they shine, which sizes to grab (five options from 3.7 mm up), placement and removal tricks, and how they stack up against micro nuts or cams. Whether you’re trad leading desert towers or aiding steep faces, these make desperate spots bomber. Stick around; your next micro-crack run gets easier.
What Trango Ball Nuts are and how the ball-and-ramp design grips the rock
Trango ball nuts fill a key gap in your rack. They offer active protection for super-narrow, parallel-sided cracks from 3 mm up. Unlike passive nuts with fixed shapes or micro cams with spring-loaded lobes, these use a simple trigger, aluminum ramp, and copper ball.
Pull the trigger first. That slides the copper ball down the angled ramp and shrinks the piece. Slide it into a tight seam or pin scar, then release the trigger. The ball moves up the ramp and presses outward against both walls for a secure bite. You get a clean, removable placement without hammering. Plus, they stay light at 30 to 70 grams and hold 7 to 8 kN.
This ball-and-ramp setup sets them apart. Passive nuts need tapering cracks to jam; they slip in straight parallels. Tiny cams work in irregular spots but bulk up too much below 8 mm and cost more. Ball nuts excel where those fail.
The simple physics, why they can hold in parallel cracks where nuts fail
Picture a doorstop under your door. You tap it in, and any pull wedges it tighter instead of popping it out. Trango ball nuts work the same way. A downward tug on the sling sends the copper ball up the ramp, which builds outward force against the crack walls.
Friction takes over from there. The ball presses harder with each bit of load, so it grips even in straight parallels where nuts slide free. Small bumps and rock texture help the ball bite in. However, success hinges on solid rock quality and a downward pull direction. Flared or crumbly spots won’t hold well.
In short, this ramp turns pull into sideways pressure. Nuts can’t match that in uniform cracks.
Why the copper ball matters (and what wear and deformation look like)
Copper brings real advantages to the ball. Softer than steel, it molds to tiny rock features for better contact and grip right away. That means solid holds in rough granite or sandstone seams.
But copper wears over time. Normal use adds light shine or faint grooves after a few routes. No big deal; it still functions. Watch for trouble signs, though. Retire the piece if the ball flattens out, loses roundness, or sticks on the ramp. Deep grooves or bent wires signal damage from falls or aid abuse.
Inspect after every trip. A quick spin checks smooth movement. Replace worn ones to keep your protection reliable.
Where Ball Nuts fit in a modern rack
Treat Trango ball nuts as specialty tools, not rack replacements. They shine alongside standard nuts and cams, not instead of them. Pack a set for spots those miss.
Trad leaders grab them for thin cracks on desert towers. Aid climbers slot them into pin scars without noise or scars. Big wall and alpine types love the small size, low weight, and high strength on long pushes.
Consider this rack combo for versatility:
- One or two #1 and #2 ball nuts for the tiniest seams.
- Micro cams starting at #0 for overlap.
- Full nut rack for tapers.
They add under 200 grams total. Climbers report bomber placements in desperate runouts. If you hit micro-cracks often, they earn their spot.
Choosing the right sizes, ratings, and how many to carry
Trango ball nuts come in five sizes. Each fits specific crack widths, from razor-thin seams to fingertip cracks. Pick based on your routes because the right size grabs bomber.
Smaller ones handle niche spots, while mids cover most action. Ratings show lab strength in kilonewtons (kN); think 7 kN as enough for a hard fall on good rock. Yet placement quality beats any number. A perfect fit holds far better than specs alone.
Size chart in plain English, ranges, weights, and strength at a glance
Crack sizes matter in real life. The #1 squeezes into seams thinner than a credit card edge, perfect for desperate granite tips. #2 fits thin knife blades you barely see. #3 matches pinky finger widths. #4 takes index fingers. #5 handles small fingertips, where tiny cams start overlapping.
Here’s the quick spec rundown. Weights stay low across the board. Strengths hit 7 or 8 kN, solid for micro pro.
| Size | Color | Range (mm) | Weight (g) | Strength (kN) |
|---|---|---|---|---|
| #1 | Blue | 3.7-6.4 | 31 | 7 |
| #2 | Red | 4.8-9 | 39 | 8 |
| #3 | Yellow | 6.1-11.6 | 49 | 8 |
| #4 | Green | 7.8-13.8 | 58 | 8 |
| #5 | Purple | 10.3-17.5 | 73 | 8 |
This table sums it up at a glance. For example, the full set weighs just 250 grams. So you add real security without rack bloat. Still, #1 stays niche because placements demand patience. Mid sizes shine more often.
A practical buying plan: the best first Ball Nutz sizes for most climbers
Start simple with your goals. Many climbers skip full sets at first. They grab proven combos instead. Because #2 through #5 offer 8 kN strength and fit common cracks. #1 works less often, so save it for later.
Consider these starter racks:
- Thin crack starter (#2-#4): Covers 4.8 to 13.8 mm. Total weight under 150 grams. Ideal for granite towers or sporty trad where seams run thin.
- All-around set (#1-#5): Full range for any micro crack. Add it if you chase clean leads in deserts or Alps. Versatile, yet light.
- Aid and pin scar focus (doubles #2-#3, singles #4-#5): Doubles in mids handle repeated scars. Great for big walls because they slot fast without noise.
Prioritize #2-#5 first. They place easily and hold strong. Climbers report more uses there. Test at the shop; feel the trigger action. Your rack stays balanced this way.
How to check fit at the crag without a ruler
No ruler needed mid-route. Use what you know. First, eye the ball width against familiar nuts. The #2 ball looks like a small hex #3. #4 matches a medium nut’s narrow end.
Next, pull the trigger and slide in slow. Release and tug light. It should seat firm, no wobble. Good ones feel like they lock instantly. Bad fits rattle or slip.
Test the pull direction too. Clip a sling and yank down; pressure builds outward. Never force into flares. Almost fits don’t count. Because forcing wears the copper or pops on load. Trust your eyes and hands instead. Practice on gear at home first. You’ll spot winners quick.
Best placements for Trango Ball Nuts (and the placements that fool you)
Spotting the right crack turns Trango ball nuts into secret weapons. They grab where small nuts slip and micro cams won’t fit. Straight-sided cracks shine brightest. Pin scars and shallow pods follow close.
Yet some spots trick you into bad holds. Learn these, and your rack protects better. Follow the RDCS rule: solid rock, clean direction of pull, tight constriction, and good surface contact. That simple check saves runs.
Rock shapes that make Ball Nuts feel “magical”
Parallel cracks top the list. These straight walls under 1 cm wide let the copper ball press both sides. Pull down, and it cams tight. Think columnar basalt or granite splitters. The #1 blue fits 3.7 mm razor seams. #2 red handles up to 9 mm. Texture helps too. Rough bumps let the ball bite hard.
Shallow seams work next. Short slots that bottom out fast suit ball nuts. No deep contact needed. Slide in, release the trigger, and it grabs. Pin scars love them most. Old piton holes or smooth constrictions take nothing else. Pros slot #3 yellow into these on desert towers like Sharkfin Tower. No hammering, no scars.
Tiny pods seal the deal. Look for slight constrictions with a micro edge. That bump makes the ball lock. A small ripple turns bomber from bad. Smooth scars too narrow for tiny nuts? Ball nuts own them. Test with a light tug. Solid means it stays put.
In short, these shapes feel magical because the ramp turns pull into grip. Practice on toprope first. You’ll place them faster.
Red flags: flares, hollow rock, and soft sandstone issues
Flares kill holds. Wide openings let the ball slide out under load. The ramp can’t build pressure. Skip them every time. Soft rock crushes worse. Hollow sandstone or sandy cracks polish the copper. It spins instead of bites. Weak desert stone flakes away. Stick to granite, basalt, or firm sandstone.
Hollow spots ring when tapped. Avoid them. Questionable rock? Walk past. Because a bad placement fails fast. Check with your eyes first. Then tug light. If it shifts, reset it. That simple rule spots trouble. Conservative choices keep you safe. Marginal rock rips even perfect fits, especially small sizes like #1 or #2.
So bail on flares and soft stuff. Your gear lasts longer that way.
Direction of pull, rope drag, and how to keep the piece from shifting
Trango ball nuts crave downward loads. A clean tug sends the ball up the ramp. Sideways pulls walk it out. Traverses mess things up most. Rope drag twists the angle. So place for straight down and slight out.
Longer slings help. They reduce drag in seams. Extend to align the stem. That keeps load perfect. Clip quickdraws above to steer the rope. Avoid sharp bends. Because twists shift the piece.
Gloved hand tests work best. Yank down gentle. Feel it cam tight. No wobble means good. On runouts, double check direction. Bad angles blow solid rock placements.
Rack doubles of #2 and #3 for versatility. Clean with a firm yank down. Nut tool pries stuck ones. These tips make ball nuts reliable.
How to place and test a Ball Nut on lead (step by step)
You find that perfect parallel seam on lead. Now place your Trango ball nut right the first time. Because a solid setup builds confidence for the runout above. Follow this routine every time. It keeps things simple and safe.
The placement routine: seat it, set it, then test it
Start with the right spot. Pick a parallel crack with solid rock and good texture. Pull the trigger to retract the copper ball 70 to 100 percent up the ramp. That shrinks the piece for easy entry.
Slide it in slow. Stop when the ball extends 30 to 50 percent on release. This leaves room for it to cam under load. Release the trigger fully. Then tug down hard in the fall direction. The ball slides up the ramp and grips both walls.
Re-check after. No wobble means good. Over-set it, and cleaning gets tough later. So seat firm but not stuck. Practice this on toprope first. You’ll nail it quick.
Here’s the full sequence:
- Eye a parallel constriction with downward pull.
- Pull trigger to retract ball completely.
- Insert until it stops snug.
- Release trigger; ball engages halfway.
- Yank down firm; feel it tighten.
- Bounce test; confirm no walk-out.
Long slings help here. They keep the angle clean. Short ones twist the load bad.
What a good placement looks and feels like
A bomber Trango ball nut placement stays rock solid. The piece doesn’t rotate or shift. You see clear contact where the copper ball presses both walls. Some shine marks show grip.
The stem lines up straight down. That matches the load direction. Tug firm but controlled. It tightens more, no edge-of-pop feel. Stable means it improves under pull.
Look close. Ball sits midway on the ramp, not maxed out. Rock texture bites in. No rattles on bounce. Because perfect ones feel like tiny cams locked. Trust that feedback. Bail if it walks even a hair.
In addition, gloved hands sense best. Yank out and down. Solid holds firm. Your rack protects better this way.
Common mistakes that lead to sketchy placements
Bad habits turn good gear bad. So spot them fast. Here’s what goes wrong most, plus fixes.
Placing in flares tops the list. The ball slides out under load. Fix it by skipping wide mouths. Choose parallels only.
Too shallow kills grip next. Ball lacks contact area. Push deeper until it stops natural. Then test hard.
Skip testing, and you trust blind. Always yank down firm. No hold? Bail to a nut or cam.
Sharp stem bends mess angles. Straighten with a longer sling. That keeps pull pure.
Zero bite spots fail last. Smooth walls spin the ball. Hunt texture or bumps. No good? Walk past.
After all, these quick checks save falls. Practice ground-side. Your leads stay clean.
Cleaning, maintenance, and when to retire Trango Ball Nuts
Trango ball nuts last longer with smart care. You clean them right after each climb, so the trigger stays smooth and the copper ball moves free. Heavy loads or falls make them stick sometimes, but patience fixes most issues. Follow these steps, and your gear stays reliable for the next lead.
How to remove a stuck Ball Nut without wrecking it
Stuck Trango ball nuts happen after weighting or falls. They grab hard, so brute force wrecks the copper ball or wires. Instead, use this basic method every time.
Pull the trigger while you push the stem inward with your thumb. This slides the ramp deeper and lets the ball release from the walls. Then wiggle gently side to side and back it straight out. After heavy use, try different angles because the ball might bind tight.
Most pop free that way. However, stubborn ones need a nut tool as a last resort. Hook it on the ball and pry outward while you push the stem in and pull the trigger. Tools like the Funkness Device work well too. Never yank the sling up hard alone; it damages the piece.
Practice on easy terrain first. Because smooth removal keeps your rack ready.
Simple care: keep the trigger smooth and check the wires
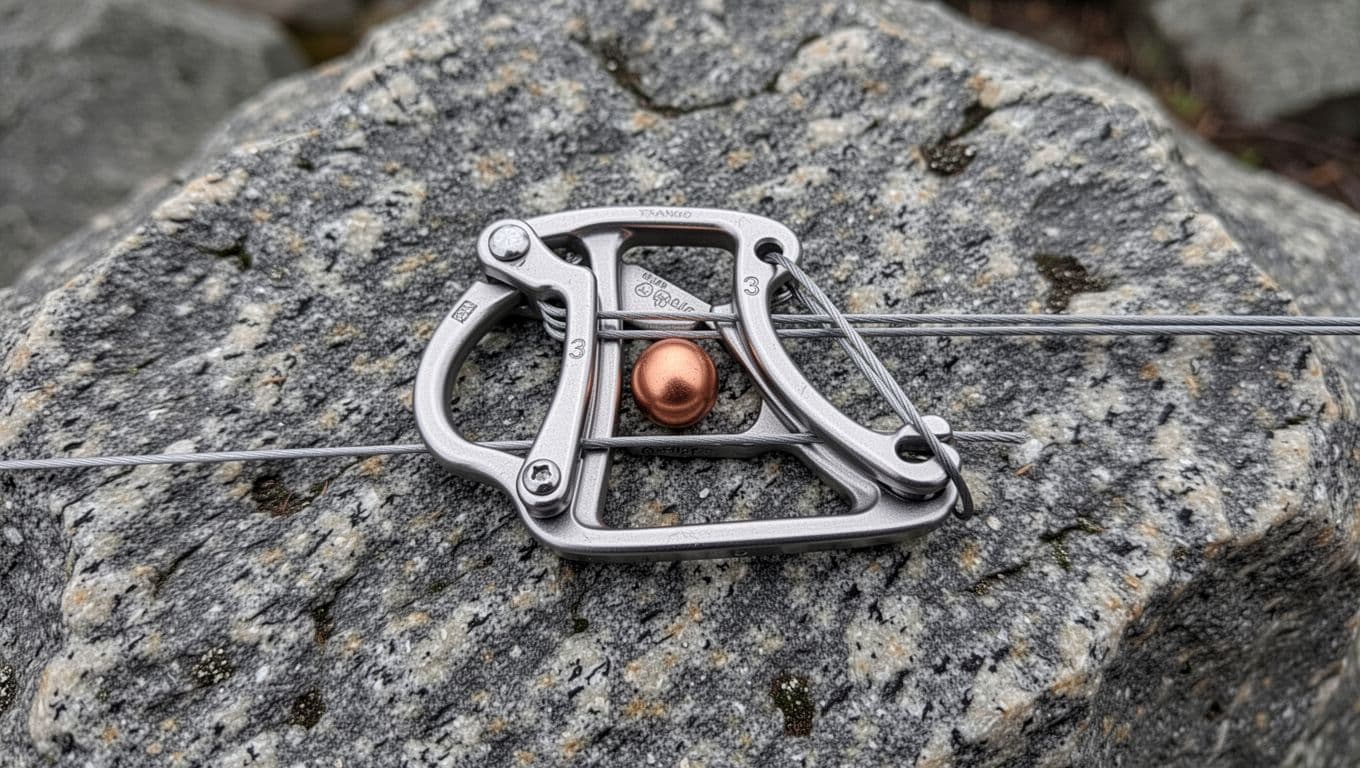
Quick checks keep Trango ball nuts working like new. Start after every trip. Pull the trigger back and forth; it should snap smooth without sticking. Next, inspect the wires for frays, kinks, or bends.
Grit builds up fast in sandy cracks, so brush it out with a soft toothbrush. Dry them fully after wet climbs because moisture rusts the ramp. Store them loose on the rack, so triggers don’t crush under heavy cams.
In addition, spin the copper ball by hand. It glides up and down the ramp easy. Straight wires mean no twists from bad pulls. These habits add years to your gear.
Retirement signs: copper ball damage, cable issues, and “unknown history” pieces
Know when to retire a Trango ball nut, so it never fails on lead. Badly flattened or cracked copper balls top the list; they won’t grip right anymore. Damaged cable strands or kinks mean the trigger sticks or snaps.
A trigger that won’t return fully signals trouble too. Besides that, ditch pieces with unknown history, like ones that took a huge fall. They might deform inside where you can’t see.
Follow manufacturer guidance always. Err on the safe side; replace after big loads or if checks fail. Solid inspections prevent problems.
Here’s what to watch:
- Flattened or cracked ball: Loses bite fast.
- Frayed or kinked wires: Weakens the whole piece.
- Sticky trigger: Won’t retract or set.
- Fall history: Hidden damage hides.
Your safety comes first.
Trango Ball Nuts vs micro cams, tiny nuts, and other ball nuts: what to choose and when
You rack gear for thin cracks, but which pieces protect best? Trango ball nuts shine in spots where brass micro nuts slip and micro cams won’t fit. Other ball nuts, like older Black Diamond or CAMP versions, work the same way with similar ramps and balls.
However, the real choice comes down to active ball nuts versus passive brass offsets or springy micro cams. Let’s break it down by crack type, speed, strength, and cleanup. You’ll see when to grab ball nuts over the rest.
Ball Nuts vs brass micro nuts: active bite vs passive wedge
Brass micro nuts excel in small constrictions and clean tapers. They wedge passively into slight flares or hourglass shapes, where the fixed brass bushing molds quick. For example, a RP #2 or HB Offset brass fits shallow pods that taper just right. Placement feels instant, and they clean fast with a wiggle. However, in slick parallel cracks, they rip out easy because no outward force builds.
Trango ball nuts win big in straight pin scars and parallel seams. The copper ball cams active against both walls, so it grips uniform granite splitters or aid scars that nuts skip. Strength edges higher too, at 7-8 kN versus 4-6 kN for tiny brass. Cost stays low for both, around $15-20 each. Still, ball nuts demand precise parallels; brass handles more variety.
In short, pick brass for tapers and speed. Choose ball nuts for bomber holds in parallels.
Ball Nuts vs micro cams: range, stability, and risk of walking
Micro cams place quick and feel familiar. Lobes expand in flares or irregular spots, so a Black Diamond RP #0 or Camalot #0 fits deeper cracks with good range per size.
Climbers trust them because cleanup pulls simple, and they resist walking less in tapers. However, they need more depth, often 1-2 cm, and rope drag can twist lobes loose in shallow seams.
Trango ball nuts squeeze into shallower, narrower spots under 1 cm. No lobes mean they slot pin scars or laser-thin parallels where cams bulk up. Stability shines downward; the ramp builds grip under load. Yet careful placement matters because bad angles walk them out.
Cleaning takes practice, push the stem while triggering. Strength beats tiny cams at 8 kN, and weights run lighter by 20-30 grams. Cams cost double, $70 plus.
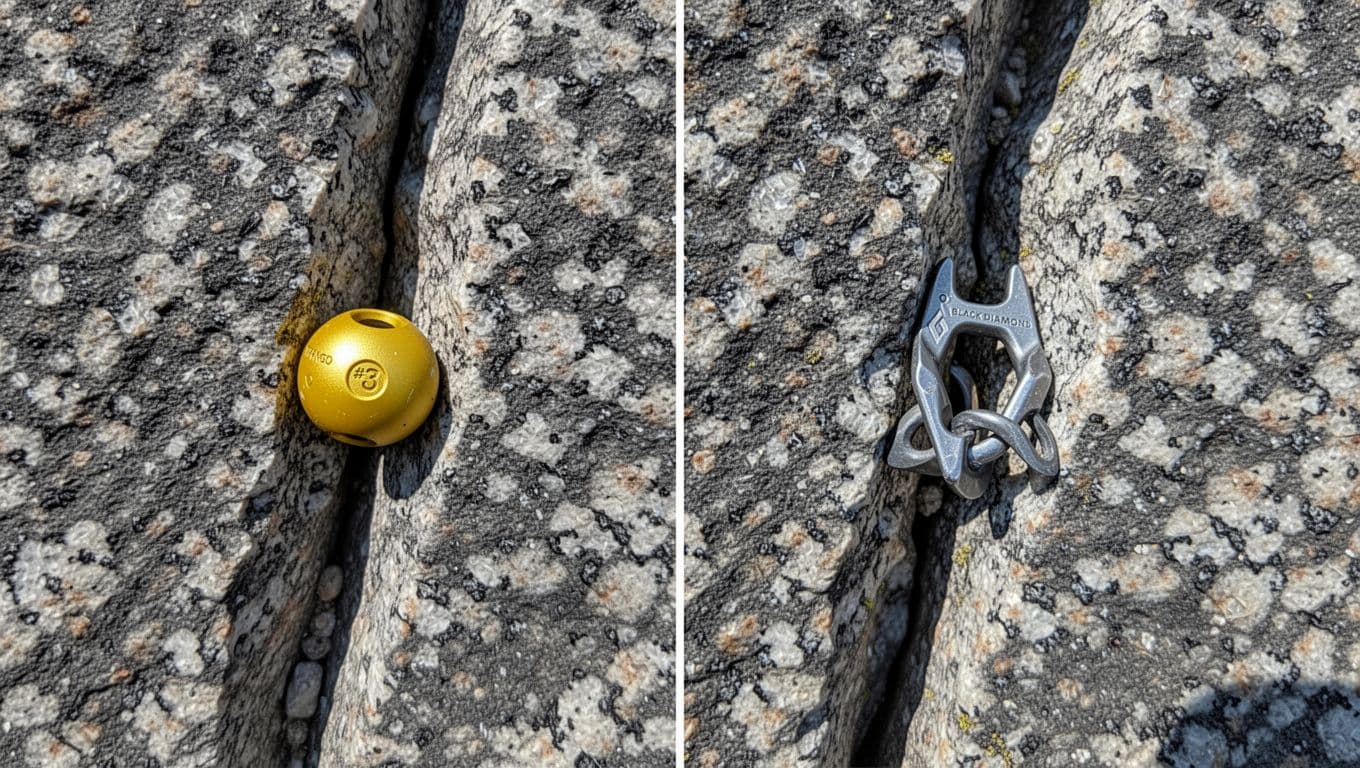
So cams suit versatile flares. Ball nuts own shallow parallels, if you test the pull.
So, are Trango Ball Nuts worth it in 2026? Who should buy them
Yes, Trango ball nuts hold strong value in 2026. Climbers still rack them for desert towers, aid leads, and alpine racks because nothing matches their strength-to-weight in thin parallels. Pros like Rob Pizem slot them clean on first ascents.
Buy them if you fit these profiles:
- Thin-crack trad leaders chasing granite splitters or desert seams.
- Aid climbers filling pin scars without hammers.
- Alpine types cutting grams on long routes.
- Desert crack runners on towers like Fisher Towers.
Skip them if you’re new leaders honing basic nut and cam skills first. Or if you rarely hit thin parallels, stick to offsets and micros.
Here’s a quick rack guide:
| Scenario | Best Choice | Why |
|---|---|---|
| Parallel scars | Ball nuts | Highest grip, light |
| Tapered pods | Brass micros | Fast, cheap |
| Flares/deeper | Micro cams | Versatile range |
Placement speed matches nuts once learned. Reliability peaks in perfect cracks. Add one set of #2-#4; it protects without bulk. Your thin leads stay safer.
Conclusion
Trango ball nuts deliver active protection for those razor-thin parallel cracks where nuts slip and cams won’t fit. Their copper ball on an aluminum ramp cams tight under downward pull, holding 7 to 8 kN in granite seams or pin scars. You get bomber holds without bulk or weight, perfect for desert towers, aid leads, or alpine racks.
They shine in straight-sided constrictions with solid rock and good texture. So skip flares, soft sandstone, or bad angles.
Place them by pulling the trigger, sliding in snug, releasing, and yanking down firm to test. Feel it tighten without wobble. For cleanup, push the stem while triggering; nut tools help stubborn ones. Inspect often for ball wear or wire damage, and retire sketchy pieces fast.
Practice pays off big. Grab a starter set of #2 to #4, or borrow from a buddy. Head to the crag base with a granite boulder or junk rock. Slot them into seams, test pulls gently, and note what grabs best: parallels, shallow pods, tiny ripples. Repeat until placements feel instant. Your rack protects those desperate runouts now.
Back to Climbing Nut Reviews
Recommended Products for Sport Climbing
These products match the equipment and gear topics covered in this article.
Affiliate disclosure: As an Amazon Associate, TradClimbers may earn from qualifying purchases at no additional cost to you.
Keep exploring helpful trad climbing, gear, safety, and technique resources.
- A Climber’s Guide to Rock Climbing in Thailand
- A Trad Climber’s Guide to the Isle of Skye Ridge
- Hueco Tanks Rock Climbing: hueco tanks rock climbing Essentials
- A Climber’s Guide to The Nose of El Capitan
- The Top 8 Unforgettable Climbing Routes El Capitan Has to Offer in 2026
- Yoga for Climbers: Boost Strength, Flexibility, and Recovery | yoga for climbers