

If you feel like you've hit a wall in your climbing, you're not alone. Just spending more time at the crag or in the gym isn't always the answer. To see real, measurable improvement—especially in the complex worlds of trad and multi-pitch climbing—you need a smart, structured plan. It's time to stop just climbing and start training with purpose.
Your Blueprint for Measurable Climbing Progression
Aimlessly throwing yourself at routes is a surefire way to plateau, get frustrated, and maybe even get hurt. The secret to breaking through is to train smarter, not just harder.
This guide is designed to give you that smart framework. And it all starts with an honest look in the mirror.
Creating Your Baseline
Before you can map out where you're going, you have to know exactly where you're starting from. A solid self-assessment is the foundation of any good training plan. This isn't about judging yourself—it's about collecting the data you need to target your weaknesses.
Take a moment and evaluate yourself honestly across these four core areas:
- Strength and Power: Can you pull off that one hard, dynamic move? How's your finger strength on small holds? This is your raw ability to execute tough sequences.
- Endurance: How long can you stay on the wall before the dreaded pump shuts you down? On a long pitch, can you recover on stances and keep climbing efficiently?
- Technical Skill: How smoothly do you move? Think about your footwork, body positioning, and specific skills like crack climbing or stemming. Are you efficient, or do you fight the rock?
- Mental Game: How do you manage fear when you're high above your last piece of gear? Are you confident in your anchor building and rope skills when things get stressful?
A cornerstone of consistent progress in any physical discipline, including climbing, involves implementing a well-structured progressive overload training program that continually challenges your body.
By rating yourself in each category, you’ll quickly see what you’re good at and, more importantly, what’s holding you back. This personal baseline is your first big step toward building a plan that works for you, whether your goal is to lead your first 5.9 trad route or tackle a big wall in Yosemite.
Setting Meaningful Goals
Now that you have your baseline, you can set goals that are both inspiring and realistic. A fuzzy goal like "get better at climbing" isn't going to cut it. You need to connect your training to tangible, real-world objectives.
For instance, instead of saying, "I want to improve my endurance," a much better goal is, "I want to link the first three pitches of Crimson Chrysalis without hanging on the rope." That's a goal you can really sink your teeth into.
Training Focus Based on Your Climbing Level
To help you figure out where to put your energy, this table breaks down the most impactful training areas based on your current experience. Use it as a starting point to make sure your efforts are focused where they'll matter most.
| Climbing Level | Primary Training Focus | Secondary Focus |
|---|---|---|
| Beginner (5.6 – 5.9) | Technique: Footwork, body positioning, movement efficiency. Learning to place solid gear. | Endurance: Building a base to stay on the wall longer and complete full pitches. |
| Intermediate (5.10 – 5.11) | Strength & Power: Finger strength, pulling power for steeper terrain. | Mental Game: Lead-head, managing fear, efficient rope systems. |
| Advanced (5.12+) | Power-Endurance: Linking hard moves back-to-back. Projecting tactics. | Specificity: Training for the exact demands of a goal route (e.g., crack size, angle). |
This table sets the stage for the detailed strategies we'll cover next. By matching your goals and training to your current level, you ensure every session is a step in the right direction.
Building the Foundational Strength for Trad Climbing
When it comes to trad climbing, strength isn't just about cranking a single hard move. It's about having the deep reserve of power needed to hang on and fiddle in a crucial piece of gear from a terrible stance. It's the body tension that keeps you glued to the rock on a long, airy traverse. This is the kind of strength that turns a desperate, sketchy situation into a controlled, manageable one.
We need to think beyond just doing more pull-ups. A smart training program builds power that actually helps you on the sharp end, focusing on the kind of grip, finger, and pulling strength that real-world trad routes demand.
Get a Grip: Prioritizing Finger Strength with Hangboards
Your fingers are your direct connection to the rock. Making them stronger delivers the biggest bang for your buck in training. The hangboard is your best friend here, but you need a structured plan to see real gains without getting injured.
For building that raw, unadulterated finger power, nothing beats max hangs. This isn't about endurance; it's about short, intense bursts of effort.
- Find Your Edge: Pick a hold (an 18-20mm edge is a great starting point) where you can hang for about 13-15 seconds before your grip gives out.
- Hang with Good Form: Pull up slightly to engage your shoulders—never hang on straight, locked-out arms. Hold for 10 seconds.
- Take a Real Rest: Rest for a full 2-3 minutes. This is non-negotiable; you need to be fresh for each hang to give a true maximum effort.
- Rinse and Repeat: Go for a set of 5-6 hangs. If your plan calls for more, take a solid 5-minute rest before starting the next set.
The whole point is to gradually increase the intensity over time. You can do this by moving to a smaller edge or, once you’re ready, by adding a bit of weight. And always, always warm up thoroughly before you touch the hangboard.
The science backs this up. It's not just a feeling; it's a fact. Research shows that trainable factors like upper body and finger strength can account for up to 64% of the difference in climbing ability. If you want to dive into the data, this comprehensive analysis of climbing performance predictors breaks down exactly how these exercises translate to results on the rock.
Building Powerful Pulling Muscles for the Crux
While fingers are key, you also need the horsepower to pull your body through steep terrain or over a bulge. This is where weighted pull-ups come in. They are an incredible tool for building upper-body power, so much so that one study found the 2-rep maximum pull-up test was the single best predictor of climbing grade among elites.
Before you start slinging weights around, make sure you can comfortably knock out 8-10 bodyweight pull-ups with clean form. Once you've got that dialed, it's time to level up.
A Simple Weighted Pull-Up Protocol:
- Start with a good warm-up of bodyweight or assisted pull-ups.
- Using a weight belt or vest, add a small amount of weight—even just 5-10 lbs is a great start.
- Your goal is 3-5 sets of 3-5 reps. The weight should feel heavy, making that last rep of every set a real battle.
- Rest for 3-5 minutes between sets. This gives your muscles time to recover so you can generate maximum force on the next go.
This isn't about chasing high numbers; it's low-rep, high-intensity work designed to build true power. This is the strength that lets you lock off on one arm to place a cam or make a powerful deadpoint to a bomber hold.
For climbers wanting to add more explosive, dynamic power to their routine, campus board training is the next logical step. Our guide on how to use campus board training offers a structured plan for safely incorporating this advanced tool.
Remember to balance this hard work with smart recovery. Limit these heavy strength sessions to twice a week, and never do them the day before a big climbing trip. This focused approach builds the functional power you need to climb with confidence and start ticking off those goal routes.
Developing Unstoppable Endurance for Long Routes
Endurance is what gets you to the top of that classic multi-pitch with a smile on your face, not a grimace. We've all been there: getting desperately pumped high on a pitch, fumbling with gear, and watching a beautiful day turn into a stressful retreat. For trad climbers, real endurance isn't just about surviving a single hard crux; it’s about maintaining your composure and efficiency, pitch after pitch.
It’s the ability to find a decent stance, shake out, and place a cam without panicking. It's having the gas left in the tank to build a solid anchor and manage the ropes, even after hours on the wall. This kind of stamina is a mix of your forearm’s ability to hang on and your body’s overall aerobic capacity to keep feeding those muscles oxygen.
The Unsung Hero: Your Aerobic Base
Most climbers obsess over finger strength, but a powerful aerobic engine is the secret weapon for long days out. When you're climbing hard, your forearms are screaming, swimming in the lactate that causes that all-too-familiar pump. A strong cardiovascular system acts like a cleanup crew, flushing out that metabolic waste much faster. This is what allows you to recover on jugs, at no-hands rests, or even during easier sections of a pitch.
It's a concept that gets surprisingly little attention in many training plans. Yet, when researchers looked at what truly predicts climbing ability, they found that cardiorespiratory fitness (VO2 max) could explain a staggering 43% of the performance difference between climbers. That’s a massive piece of the puzzle. Improving your general fitness is a direct line to climbing harder and longer. If you want to dive into the science, the research-backed training insights on Climbing.com are a great place to start.
Building Climbing-Specific Endurance
While a good run or bike ride helps, nothing beats training that mimics the specific demands of climbing. You need circuits that simulate the stop-and-go rhythm of a hard pitch, pushing you into the pump zone and then forcing you to recover while still on the move. This is how you teach your body to become ruthlessly efficient.
Endurance is not just physical; it's mental. Training your body to handle the pump teaches your mind to stay calm when you feel fatigued high on a route. This composure is a critical skill for trad climbing.
Here are a couple of my favorite, time-tested workouts for building the kind of power endurance that long, demanding routes require.
On-The-Wall Circuits: 4x4s
This classic workout is a beast, but it’s one of the best ways to boost your power endurance. The goal is to simulate climbing through multiple cruxes with no real rest.
- Find your circuit: Scout out four boulder problems you can consistently send in a couple of tries when you're fresh. They should be challenging but not at your absolute limit.
- Climb without stopping: Climb the first problem, immediately downclimb an easy, designated route, and traverse to the next problem without stepping on the floor.
- Complete the set: Keep moving until you've climbed all four problems back-to-back. That’s one full set.
- Rest and repeat: Take a solid 4-5 minute rest after the full set. The goal is to grind out four of these total sets.
Be warned, this workout is brutal. But it’s incredibly effective at training your body to perform and recover under serious stress.
Linked Boulder Circuits
This workout is less about raw power and more about building a deep aerobic base and perfect movement. Think of it as creating your own long, sustained "route" in the bouldering gym.
- Build your route: Pick 10-15 boulder problems that are well below your onsight grade. The focus here is on continuous movement and volume, not sheer difficulty.
- Keep it moving: Climb the problems one after another. Your rest is just the time it takes to walk to the next boulder—aim for only 30-60 seconds between problems.
- Focus on flow: This is your chance to practice perfect technique. Concentrate on smooth, efficient movement, precise footwork, and relaxed, rhythmic breathing. Avoid the dreaded over-gripping.
By weaving one or two of these sessions into your weekly training, you'll start building the kind of deep endurance that makes long, committing climbs feel less like a battle and more like the adventures they're meant to be.
Mastering Movement and Technique on Real Rock
Strength gets you up the wall, but technique is what makes you a climber. This is never truer than in trad and multi-pitch climbing, where raw power takes a backseat to efficiency. Good movement isn't just about saving energy for the crux; it’s about maintaining the poise you need to place gear, decipher a tricky sequence, and keep your head straight when you're high off the deck.
The goal is to move so well that you don't have to think about it. We want to take conscious, clunky efforts and burn them into our muscle memory until they become fluid, automatic responses. This is the difference between simply climbing and truly dancing up the rock.
The Art of Trad-Specific Technique
Gyms are great, but they rarely prepare you for the unique physical puzzles of trad climbing. Learning to jam your body into cracks, for instance, is a whole new language of movement. It's awkward and painful at first—we've all been there—but mastering it unlocks entire universes of classic routes.
- Hand Jams: This is your foundation. Think about slotting your hand into a crack, thumb down, then flexing your thumb across your palm to create a camming action. When you get it right, it feels incredibly solid.
- Finger Locks: For thinner cracks, you'll need to stack your fingers and torque them into a constriction. This one takes precision and a healthy dose of grit.
- Foot Jams: Your feet are your secret weapon. Instead of trying to edge on the outside of a crack, turn your foot sideways and twist it in. This takes a massive amount of weight off your arms and is the key to floating up long crack pitches.
The best place to start is on artificial crack volumes in the gym or, even better, on a well-protected top rope at your local crag. This lets you focus completely on the feel of the movement without the mental overhead of leading.
Your body learns what you teach it. If you only train powerful, dynamic moves indoors, you'll struggle with the subtle, technical balance required for a 100-foot granite slab. A varied climbing diet is essential for becoming a truly adaptable climber.
Mixing up your training environments is a proven strategy. In fact, you can explore the data on what predicts climbing ability and see how climbers who train both indoors and out consistently build a more versatile skill set. It just makes sense.
Drills for Deliberate Practice
To get better, you can't just climb; you have to practice. This means isolating specific skills and drilling them until they become second nature. This is how you overwrite bad habits. Bouldering is the perfect laboratory for this kind of focused work, and our guide on indoor bouldering tips offers a solid framework for structuring these sessions.
Try baking these drills into your warm-ups or cool-downs:
- Quiet Feet: Pick an easy route and climb it with one rule: your feet must make absolutely no noise. Place each foot perfectly the first time. This drill is a game-changer for building precision.
- Eyes-Closed Traverse: Find a simple traverse you know well. Climb it once normally, then try it again with your eyes closed (or looking away from the holds). This forces you to rely on body awareness and feel.
- Hover Hands: As you climb, make yourself pause and hover your hand over the next hold for a full three seconds before you grab it. This kills the habit of desperately snatching at holds and teaches you to find a stable body position before you move.
Pacing and Finding Rests
On a long route, energy management is everything. The best climbers I know are masters of pacing. They know when to punch it through a crux and when to dial it back, constantly scanning the rock for a chance to recover.
Learn to spot the rests that others miss. A good stem between two features, a high foot that takes weight off your arms, or a sneaky kneebar can give you just enough time to shake out and get your heart rate back under control. On your next day out, make it a game to find and use as many of these "micro-rests" as possible. It's a skill that pays off big time when you're 500 feet off the ground and starting to feel the fatigue.
Sharpening Your Mental Game and Safety Systems
You can have all the physical strength in the world, but if your head isn't in the right place on a trad lead, you're not getting up that pitch. The real separator between flowing up the rock and getting paralyzed by fear often has nothing to do with your muscles—it’s about the conversation happening in your head.
Success on gear comes down to making clear-headed decisions under pressure. This only happens when you have absolute, unwavering trust in your safety systems. Let’s dial in those skills.
Building Unshakable Gear Confidence
Let's be honest: the fear of taking a whip on your own gear is the biggest hurdle for most new trad leaders. You can’t just wish that fear away. You have to build confidence from the ground up, one solid placement at a time.
Start with "ground school." Take your full rack to the base of a cliff and just play. Find every type of crack you can—vertical, horizontal, flared, you name it—and place gear. Pull on it. Give it a solid bounce test. Get a real feel for what a bomber piece feels like versus a sketchy one.
Once you’re feeling good on the ground, it's time to add some height with mock leading.
- Rig a toprope: Get a more experienced friend to set up a toprope on a climb you know you can do easily.
- Lead on backup: Climb from the ground up, placing gear exactly as you would on a real lead, but with the full security of the toprope.
- Test every piece: After placing a cam or nut, have your belayer take in the toprope slack. Now, sit on your gear. This gives you immediate, undeniable feedback on how good your placement is.
This is probably the single most valuable exercise you can do. It takes the fear of a real fall completely out of the equation, letting you focus 100% on the mechanics of placing solid gear. It’s how you develop that deep, intuitive trust that lets you push your limits above a piece.
Managing the Head Game
Even with bomber gear, your mind can be the crux of the pitch. Staying calm when you’re a little run-out or committing to a sequence above your last piece is a skill, and it needs to be trained just like your grip strength.
When you feel that familiar panic rising—your breathing gets shallow, your hands start over-gripping—that's your cue to interrupt the cycle. Stop what you’re doing, find the best stance you can (even a bad one is better than nothing), and take three slow, deep breaths. It sounds simple, but this can physically lower your heart rate and pull your focus back to the present.
The words you use in your head dictate everything. Stop thinking, "Don't fall." That just focuses on the negative. Instead, switch the script to, "Okay, left foot here. Now, right hand to that crimp." Concentrate only on the next immediate move.
This is a mental muscle. The more you flex it on easy climbs, the stronger and more reliable it will be when you really need it on your project.
Refining Your Rope and Anchor Systems
A quiet mind on a long multi-pitch comes from knowing your systems are flawless. Fumbling with ropes or second-guessing an anchor build just adds mental noise, distracting you from the climbing itself. Efficiency isn't just about speed; it's about being smooth, secure, and simple.
Your goal for every anchor is to make it SERENE: Solid, Efficient, Redundant, Equalized, and with No Extension. Practice building three-piece gear anchors over and over until it becomes second nature.
Rope management is just as critical. A tangled mess at a hanging belay is more than just frustrating—it’s a genuine safety hazard.
Tips for Tangle-Free Multi-pitching:
- Stack the rope perfectly: As you bring your partner up, stack the rope in neat coils over your anchor tether. Start with big loops and make them progressively smaller. This little trick ensures the rope pays out smoothly when you set off on the next pitch.
- Use clear commands: Agree on simple, standard commands with your partner. When you both know exactly what's happening, anxiety drops for everyone.
- Keep a tidy station: Clip gear you're not using back on your harness, organized and out of the way. A clean belay is a safe and happy belay.
Dedicating real time to practicing these technical skills pays huge dividends. The less brainpower you have to spend worrying about your systems, the more you have to unlock the puzzle of the climb in front of you. To take a deeper dive into this, you can learn more about how to build confidence on your first trad lead and apply these same principles.
Your Weekly Training Plan and How to Track Progress
Alright, enough theory. Let’s translate all that talk about strength, endurance, and technique into a real-world weekly schedule. This is your "microcycle"—a structured plan that pushes you hard but also gives you the recovery time you absolutely need to get stronger.
Without a plan, it's all too easy to just climb until your fingers give out, neglecting certain skills while overtraining others. That's a fast track to a plateau, or worse, an injury. A solid weekly structure gives every session a clear purpose, ensuring you're building a complete foundation as a climber.
Sample Weekly Training Microcycle for Intermediate Trad Climbers
Let’s get specific. Imagine you're a solid 5.10 trad climber who wants to break into the 5.11s. Your week needs to cover all the bases—power for cruxes, endurance for long pitches, and plenty of time on real rock.
Here’s a look at how you might structure your week to balance different energy systems and skills without burning out.
A well-balanced week is key. One day you might focus on explosive bouldering, the next on stamina, and then get outside for mileage, all while weaving in critical rest days. This sample schedule is a great starting point.
| Day | Focus | Example Activities |
|---|---|---|
| Day 1 | Strength & Power | After a good warm-up, hit the hangboard for max hangs (5 sets of 10-sec hangs). Follow up with weighted pull-ups (4 sets of 4 reps) and finish with 45 minutes of limit bouldering on your project. |
| Day 2 | Rest | Active rest is best. Think a light walk or some gentle stretching. Hydrate and focus on quality nutrition. |
| Day 3 | Endurance | Warm-up, then jump into 4×4 boulder circuits to build power endurance. Cool down with focused mobility work for your hips and shoulders. |
| Day 4 | Rest | A true rest day. This is non-negotiable. Your muscles rebuild and get stronger when you’re not training. |
| Day 5 | Technique & Mileage | Get outside! Spend the day leading pitches at or just below your onsight level. The goal here is volume, practicing smooth gear placements and efficient movement. |
| Day 6 | Active Recovery | Get the blood flowing with light cardio, like a 30-minute jog or bike ride. This is also a great time for foam rolling and deep stretching. |
| Day 7 | Rest or Outdoor | Listen to your body. If you feel wrecked, take another rest day. If you feel good, head to the crag for a low-intensity session focused on fun. |
Remember, you can’t out-train a bad diet. To keep up with this kind of volume and see real progress, you need to be intentional about what you eat. Knowing the right foods that help muscle recovery is a game-changer for any serious training plan.
Tracking Progress with a Climbing Journal
If you’re not tracking your training, you’re just guessing. A simple notebook or a phone app is one of the most powerful tools you have. Get in the habit of logging every session—and I don't just mean noting which routes you sent.
Track how you felt. Were you tired? Fired up? Scared? What did you eat that day? How much sleep did you get?
Your journal is your personal data hub. It reveals patterns your memory will forget. A few weeks of data can show you why you’re feeling strong or why you’re suddenly hitting a wall.
It's not just about physical gains, either. Your mental game is just as important, especially in trad climbing where managing your head is half the battle.
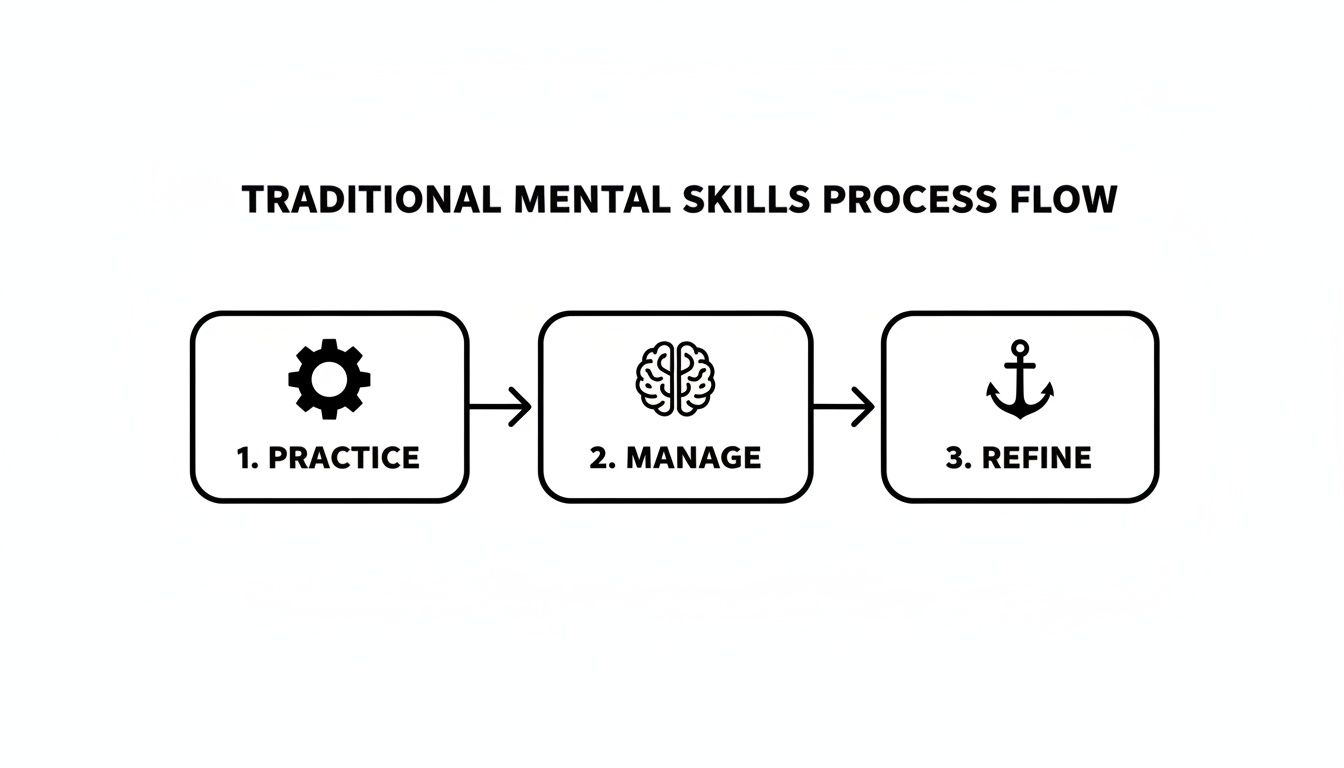
This process shows how everything connects. You start by practicing the fundamentals—like placing gear until it's second nature. That practice builds the confidence you need to manage fear and stress when you're runout above a piece. Over time, you refine your entire system, becoming a safer, more efficient, and more confident climber. By logging this journey, you’ll see your mental confidence grow right alongside your physical strength.
Common Questions on the Path to Better Climbing
As you start to think more seriously about your climbing, a lot of questions naturally come up. Let's tackle some of the big ones I hear all the time from climbers looking to build a solid training plan.
How Long Until I Actually Get Better?
This is the big one, isn't it? While everyone's journey is different, most climbers who stick to a consistent plan see a noticeable jump in their ability and confidence within 3-6 months.
The steepest learning curve often happens in the first six years of dedicated climbing. The real secret, though, is consistency. Forget about epic, once-a-month beatdown sessions. You'll see far more progress with two to four focused climbing or training days each week. Slow and steady really does win the race here.
Can I Become a Good Trad Climber Just by Training in the Gym?
In short, no. A climbing gym is an incredible tool for building raw strength and the power endurance you need for long pitches. But trad climbing is a different beast entirely.
The gym builds your engine, but the crag teaches you how to drive. You simply can't learn to read complex rock, place solid gear, or manage your head on the sharp end by pulling on plastic.
Think of it this way: use the gym as your weight room to get physically stronger. But your real practice—the kind that makes you a competent and safe trad climber—has to happen on actual rock.
What's More Important: Strength or Technique?
Ah, the age-old debate. The truth is, they feed each other. You can't separate them and expect to climb your best. Pure strength without technique is just wasted energy.
When you're starting out, your main focus should be on how you move. Nailing your footwork, finding your balance, and climbing efficiently will build a massive foundation. As you progress, that's when targeted strength training—especially in your fingers and core—becomes the key to unlocking bigger grades. You need strength to pull the hard moves, but you need technique to get there without burning out.
Recommended Products for Trad Climbing
These products can support safer climbing, belaying, rappelling, and emergency readiness.
Affiliate disclosure: As an Amazon Associate, TradClimbers may earn from qualifying purchases at no additional cost to you.
Keep exploring helpful trad climbing, gear, safety, and technique resources.
- A Climber’s Guide to Rock Climbing in Thailand
- A Trad Climber’s Guide to the Isle of Skye Ridge
- Hueco Tanks Rock Climbing: hueco tanks rock climbing Essentials
- A Climber’s Guide to The Nose of El Capitan
- The Top 8 Unforgettable Climbing Routes El Capitan Has to Offer in 2026
- Yoga for Climbers: Boost Strength, Flexibility, and Recovery | yoga for climbers