

Thin cracks can shut you down fast, especially when your smallest cam still feels too big and a normal nut sits like a coin in a slot. That’s where micro nuts come in, small passive pieces meant for tiny constrictions where you still need real protection.
The DMM IMP Brass Nut Set is built for those tiny, marginal placements, and the name says it plainly. DMM IMP stands for Immaculate Marginal Protection, and these brass micro nuts are meant to bite when the rock only gives you a few millimeters to work with.
In this post, you’ll get a clear look at what’s in the set (sizes #1 through #5), how small they actually fit, and what their strength ratings mean in the real world. We’ll also cover why brass behaves differently than aluminum, including how it can seat and hold in thin cracks, and why it can wear and deform faster over time.
Most importantly, you’ll learn where IMPs shine on route, when they’re the wrong tool, and how to place them safely so they stay put when it counts. If you’ve ever stared at a tiny seam and wished you had one more option, this set is made for that moment.
What you get in the DMM IMP Brass Nut Set, sizes, colors, and strength
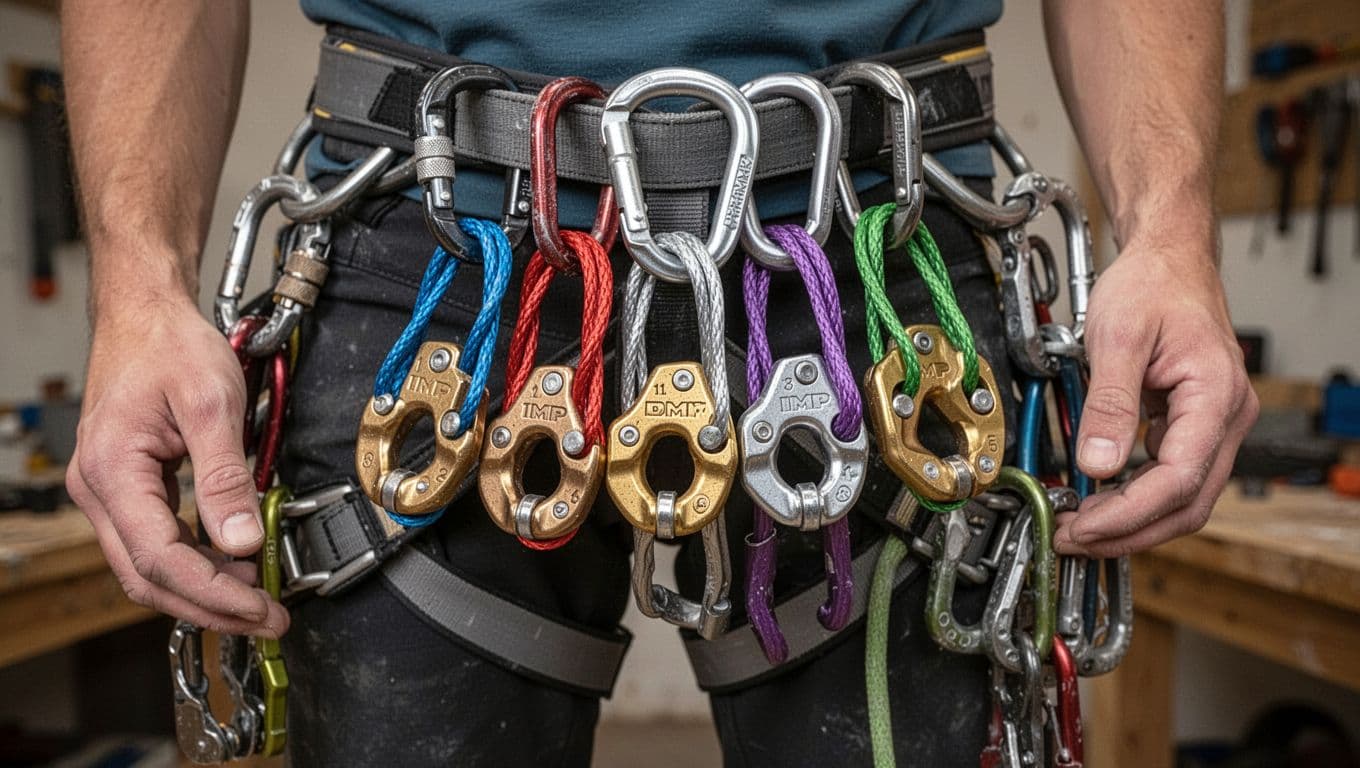
You get a standard set of five DMM IMP brass micro nuts, numbered #1 through #5. These come color-coded for quick grabs during a pitch: blue for #1, red for #2, silver for #3, purple for #4, and green for #5.
The full range spans crack widths from 4.0 mm to 11.7 mm, with a total weight of just 51 grams. Each nut uses a 7.5-inch (190 mm) wire that’s stiff enough to poke into tight spots yet flexible for easy cleaning and self-equalizing under pull.
Strength ratings run from 4 kN to 7 kN. One kN equals about 225 pounds of force, so smaller nuts hold less because their heads are narrower and bite less rock. In addition, the brass heads grip well in shallow flares, but the wire helps them stay aligned during loads.
Quick size-by-size snapshot, from #1 micro seams to #5 thin cracks
Here’s a fast breakdown of each size. It includes the target crack width, strength rating, and best use case. Check the table below for side-by-side details.
| Size | Color | Crack Width (mm) | Strength | Best Use |
|---|---|---|---|---|
| #1 | Blue | 4.0-5.6 | 4 kN | Pin scars or the tightest micro seams where nothing else fits. |
| #2 | Red | 4.8-6.4 | 5 kN | Thin seams with slight widening for a bomber in marginal granite. |
| #3 | Silver | 6.4-7.9 | 5 kN | Shallow constrictions that need extra bite without much room. |
| #4 | Purple | 7.9-9.5 | 7 kN | Wider thin cracks or pods where you want solid hold on soft rock. |
| #5 | Green | 9.5-11.7 | 7 kN | Thin horizontal cracks or the largest seams before cams take over. |
This setup lets you cover a progression of tiny placements. For example, start with #1 in that hairline, then step up as cracks open. Weights climb from 4 grams (#1) to 16 grams (#5), so the set stays light overall.
What the ratings really mean when you fall, hang, or aid
Those kN numbers mark the minimum force before failure in tests. However, real climbs differ. A bodyweight hang (say, 80 kg or 175 lbs) generates under 1 kN, so even the #1 holds fine for resting or aid moves. Short falls add force, but rope stretch absorbs much of it.
Consider fall factor: a short slip right above the piece (factor 0.3) might hit 2-3 kN on good rope. Yet, a higher factor 2 fall could spike to 8-10 kN, overloading micro nuts fast. Direction matters too; pulls straight out rip them quicker than downward tugs. As a result, DMM IMP nuts excel in hangs and low-consequence falls, not big whippers.
Micro gear like this isn’t for casual airtime. Rope diameter, stretch, and even knot friction change the math. Always test your placement by bouncing lightly. Above all, check rock quality; crumbly edges fail before the nut does. Back it up with another piece when possible, and inspect for wear after use. That way, you keep risks low on thin routes.
Why brass matters in tiny placements (and when it does not)
Brass heads on DMM IMP nuts shine in tight spots because they deform just enough to match rock flaws. You get better bite and grip on tiny edges or slight flares where aluminum nuts often skate out. However, brass isn’t a fix-all; it still demands solid rock and a true constriction to hold firm.
In parallel cracks or bomber flares, aluminum works fine and cleans easier. Brass helps most when you face small irregularities, like polished seams or scars.
Brass vs aluminum nuts in plain English
Brass feels softer in your hand, and that matters on the rock. It bites deeper into tiny edges because the metal molds to match uneven surfaces. Friction builds fast as it deforms under load, so it sticks where aluminum slides.
Aluminum nuts stay rigid. They rely on their curved shape for hold, which works great in smooth, parallel cracks. Yet, in small flares or polished granite seams, they lack that extra grip. Brass often seats better there.
Take pin scars, for example. These old drill marks leave shallow pockets. A DMM IMP brass nut squishes to fill them, creating solid contact. In limestone pockets, brass conforms to soft edges without shearing out. Aluminum might sit loose or pop free.
Still, brass wears faster on rough rock. It shines in small, uneven placements, but pick aluminum for clean lines.
Here’s a quick side-by-side look:
| Feature | Brass (DMM IMP) | Aluminum Nuts |
|---|---|---|
| Bite | Deforms to grip irregularities | Relies on shape, less adaptive |
| Friction | Higher from conformance | Good in parallels, slips in micros |
| Best Spots | Pin scars, limestone, tiny flares | Smooth seams, wider constrictions |
In short, brass helps when rock fights back with flaws.
The wire and head design, why soldering and thicker wires can be a plus
DMM IMP nuts use a soldered design. Soldering fuses the brass head directly to the wire with heat and filler metal. This creates a strong bond without loops or swages that weaken over time.
Because of soldering, DMM fits a thicker cable into small sizes. Thicker wire boosts durability and strength. It resists kinks better and handles repeated pulls. As a result, the nut stays reliable for multiple routes.
Thinner wires on some micros bend easy, but they kink under side loads. Keep DMM IMP cables straight when placing. Yanking sideways stresses micro gear hard, so align it first.
Soldering also cuts weight while keeping flexibility for pokey placements. You get a stiff-yet-bendable wire that self-equalizes in shallow spots. Inspect for kinks after big falls, though. A straight cable lasts longer.
Most importantly, this setup pairs perfect with brass heads. Together, they tackle marginal cracks without failing early.
How to place DMM IMP nuts so they actually hold
You spot a thin seam. Your smallest cam won’t fit, and a regular nut rattles loose. Grab a DMM IMP brass nut. These passive pieces shine in constrictions from 4 mm to 11.7 mm. They hold without expanding, so they work in wet or icy cracks. However, slick or dirty rock makes seats worse. Always seek solid rock first.
Start simple. Find a taper or pinch where the crack narrows. Pick the size that matches the narrowest spot, like #1 blue for 4-5.6 mm scars. Push the brass head in narrow-end first. Seat it with a firm tug downward. Then bounce your weight lightly. Confirm the pull stays straight into the taper, not sideways. Brass deforms to grip flaws, but poor rock fails fast. Test every piece. Skip shaky ones.
Shallow placements tempt you. They seem quick. Yet, they need real constriction behind the head. Flares widen out, so nuts cam free. Check rock quality too. Clean dirt. Feel for firmness. In short, place smart to make DMM IMP nuts hold when you need them.
Step-by-step placement check, size, seat, set, and clip
Follow this quick process every time. It keeps DMM IMP nuts solid.
First, look for a taper. The crack must narrow somewhere. Slide the nut in narrow-end first until it stops.
Next, test for wiggle. Grab the wire. Tug up and down. No movement means good.
Then, set with a tug. Pull down hard. Brass bites deeper. Bounce your body weight if it feels stable.
After that, check the wire. Make sure it bends over no sharp edges. Straight cables last longer.
Finally, clip clean. Attach the rope directly. Or use a short sling. This keeps pull in line.
Here is the checklist in action:
- Taper check: Narrow spot? Yes, insert.
- Wiggle test: Solid? Tug again.
- Set tug: Bites? Bounce.
- Wire check: Straight? Adjust.
- Clip: Direct pull? Done.
Do this fast. Practice builds speed. As a result, your placements stick.
Common bad placements, shallow bites, flares, and “it feels ok” pieces
Bad spots kill confidence. Climbers grab them anyway. Avoid these traps.
Surface roughness without constriction fools you first. Rough walls seem grippy. Yet, no taper means it pulls straight out. Recognize gritty but wide cracks. Resize bigger or move up and down for a pinch.
Expanding flares widen outward next. The nut cams free under load. Spot them by the V shape. Skip entirely. Search parallel spots nearby.
Loose flakes hide gear poorly. The block shifts and dumps the nut. Tap rock first. Hear a rattle? Pass. Equalize over firm edges instead.
Tiny nuts in soft rock crumble last. A #1 in mush feels ok until it blows. Feel for give. Trust larger sizes or keep hunting solid stone.
Spot these quick. Walk away. Better gear comes next pitch.
How to back up micro gear without making a mess
One DMM IMP nut won’t catch big falls. Back it up simple.
Place a second piece nearby first. Stack two in the same crack. Or offset in parallel seams. Loads share better.
Extend with an alpine draw next. Thin slings reduce rope walk. They cut sideways pull too. Clip the nut short. Rope stays aligned.
Avoid overloading solos most of all. Tiny wires break at 4-7 kN. Don’t bet your life on one.
Basic equalization helps. Link pieces so force splits even. Use a cord or sling between them. No fancy knots needed. Just keep pulls inward.
For example, two #2 IMPs side by side hold twice the force. Add a #1 Wallnut above if the crack widens. Test the cluster. Tug hard.
In desperate spots, cluster three micros. But inspect rock close. Soft stone still fails. On lead, start with bigger #2+ sizes. They take leader falls better.
These steps build safe runs. You climb bolder.
Where DMM IMP shines on real climbs and who should carry it
You reach those spots where the crack pinches to nothing. Standard nuts skip right over them. Cams sit too fat. That’s when DMM IMP brass nuts step up. They fit seams from 4 mm wide and grab pin scars or compact granite where bigger gear fails. Climbers pack them for runout thin cracks or soft rock routes. However, they demand skill to place right. Beginners skip them until they master judgment first.
These micros add security without much weight. You carry the set for desperate cruxes. Yet, leave them home on easy pitches or wide cracks. They wear fast anyway. Experienced trad leaders, aid specialists, and alpinists benefit most. In short, know your routes before racking up.
Thin cracks, pin scars, and the “nothing else fits” moments
Thin cruxes test your rack hard. The seam narrows to a hairline. Your #0 cam won’t touch sides. Grab a DMM IMP #1 or #2. It slips in and bites thanks to brass that molds tight.
Pin scars show up next. Old aid bolts leave shallow pockets. Regular nuts rattle loose. However, these micros fill the void. The brass deforms to match edges. You protect that sketchy move above.
Sometimes you squeeze one between bigger pieces. Gaps appear in your string. A #3 IMP bridges them fast. It adds backup without fuss. Or build a stance on a ledge. Limited options force creative spots. Stack a #4 or #5 in a pod. Suddenly, you rest secure.
Compact rock suits them too. Polished seams resist cams. DMM IMP nuts conform instead. They hold where small cams walk or blow. As a result, you push past the hard section calm.
Trad leading, aid, and alpine, which styles benefit most
Trad leading calls for them now and then. You lead crack routes with thin sections. Place a DMM IMP as occasional pro. It saves runouts on granite faces. However, don’t whip onto tiny sizes. Larger #3 to #5 work best for falls. Good judgment keeps risks low.
Aid pitches change the game. You use them often here. Tiny placements build ladders up blank walls. The soldered wires take repeated hangs. Brass grips pin scars or micro roofs. Climbers call them essential for big walls. Sizes #1 to #3 shine most.
Alpine terrain fits lightweight insurance. Wind scours ridges bare. Small cracks hide in quartzite. A #2 or #3 IMP protects quick. You rack light for fast ascents. Distant peaks demand minimal gear. Yet, pair with offsets for mixed rock.
Micro gear always needs sharp eyes. Brass wears on rough granite. Cables kink under abuse. Practice on toprope first. Then rack for real climbs.
Who skips the set? New trad climbers do. They lack placement feel yet. Easy routes ignore them too. Wide cracks take cams fine. Save weight for sporty days. In addition, stash at home if routes stay bomber. Focus on standards instead.
Experienced folks grab them for thin adventures. You climb bolder with options. Test limits safe.
Buying advice, value, and smart alternatives to consider
You found the right tool for thin cracks with DMM IMP brass nuts. Now decide if they fit your budget and rack. Full sets run $160 to $181 at most spots, like REI at $181 or Rock and Snow around $161. One shop, EpicTV, lists them for $85, so shop around. Prices shift, but the value holds because these micros weigh just 51 grams total. They fill gaps where cams and stoppers fail. Buy full if thin granite defines your climbs. Pick partial sets otherwise to save cash. Compare size range, strength, head shape, and local rock fit before committing. In addition, regular stoppers handle bigger spots, so pair wisely.
Full set or partial set, how to choose for your rack and your rock
Climb thin granite cracks often? Grab the full #1 to #5 DMM IMP set. It covers 4.0 mm to 11.7 mm seams completely. You protect every marginal pinch without gaps. Frequent users on routes like those in Yosemite or the Black Canyon get full value.
Only need micros sometimes? Start with mid sizes like #2 to #4. They handle 4.8 mm to 9.5 mm, most common thin cracks. Save $50 to $80 versus full price. Still cover pin scars and slight widenings. Budget wins here.
Already own other micros? Fill gaps instead. Add #1 and #5 if your set skips tiniest or largest micros. Weight stays tiny at under 10 grams each, so carry extras freely. Choice boils down to budget and how often you face hairlines.
Test in your rock type first. Granite suits full sets because flaws demand all sizes. Sandstone favors mids for softer edges. As a result, match your local crags. Full sets cost more upfront, but they last seasons with care.
How DMM IMP compares to regular stoppers and other micro nuts
Regular stoppers fit wider cracks, from 6 mm up. They leave thin seams empty. DMM IMP nuts take over there, down to 4 mm. So, rack both for full coverage.
Other micro nuts overlap in size. Check their range first. Some start at 3 mm, others end at 10 mm. DMM IMP hits 4 to 11.7 mm sweet spot. Strength matches too, 4 to 7 kN across sizes.
Head shape sets them apart. Brass on DMM IMP deforms for bite in flares. Others use rigid steel or aluminum that skate on polish. Many climbers pick brass for tiny spots because it grips well. However, rigid heads last longer on rough granite.
Placement feels different. Soldered wires on DMM IMP poke precise. Thinner wires elsewhere bend easy but kink fast. Durability trades off; brass wears quicker yet seats solid. Test in your rock. Does it hold a bounce? Compare handling on practice laps. In short, DMM IMP excels where bite trumps longevity.
Where to buy, what to check when it arrives, and basic care
Hunt at REI, Backcountry, CampSaver, or local shops. Online spots like Rock and Snow or Climb Aloha stock them too. REI charges $181 with easy returns. Smaller stores offer advice. Prices dip to $85 at EpicTV sometimes. Compare shipping and stock before clicking.
Gear arrives? Inspect close. Check solder joints for cracks. Feel wires for kinks or frays. Read labels for size and strength match. Bad factory work shows here; return fast.
Keep them clean after use. Wipe dirt and chalk. Store dry, away from sweat or salt. Brass corrodes otherwise. Retire damaged pieces. Bent wires or mushroomed heads fail. Follow DMM guidance: no big falls on worn nuts.
Basic steps extend life. Rinse in water post-climb. Dry fully. Rack loose in a bag. As a result, your set stays ready for thin adventures.
Conclusion
DMM IMP brass nuts deliver tiny protection that fits cracks from 4 mm to 11.7 mm. Brass heads deform for superior bite in pin scars and flares, where aluminum slips. They pack solid strength at 4 to 7 kN, yet weigh just 51 grams total. Therefore, these micros add security without rack drag.
Experienced trad leaders, aid climbers, and alpinists love them most. You grab the set for runouts on granite faces or desperate cruxes. However, beginners should build placement skills first. In addition, they shine on thin routes like Yosemite cracks.
Most importantly, micro gear demands perfect seats and backups. Always test with tugs and bounces. Back up with offsets or clusters to share loads. Poor rock or flares fail fast, so inspect close.
Practice placing and cleaning DMM IMP nuts on the ground now. Bounce them in real cracks. Then rack them for routes where nothing else fits. You climb bolder and safer that way.
Back to Climbing Nut Reviews
Recommended Products for Trad Climbing
These products match the equipment and gear topics covered in this article.
Affiliate disclosure: As an Amazon Associate, TradClimbers may earn from qualifying purchases at no additional cost to you.
Keep exploring helpful trad climbing, gear, safety, and technique resources.
- A Climber’s Guide to Rock Climbing in Thailand
- A Trad Climber’s Guide to the Isle of Skye Ridge
- Hueco Tanks Rock Climbing: hueco tanks rock climbing Essentials
- A Climber’s Guide to The Nose of El Capitan
- The Top 8 Unforgettable Climbing Routes El Capitan Has to Offer in 2026
- Yoga for Climbers: Boost Strength, Flexibility, and Recovery | yoga for climbers