

You’ve just started leading trad routes, and those cracks look intimidating without gear to protect them. Nuts offer a simple fix. They’re passive protection pieces that wedge into cracks to catch falls; no springs or moving parts mean they’re light, strong, affordable, and reliable.
A solid climbing nut set lets you build confidence on real rock. Beginners often skip them for cams alone, but that limits your options in tight or shallow spots. Nuts double your placements, especially on beginner routes, and cost way less than a full cam rack.
In this post, I will cover how to pick your first climbing nut set from trusted brands like Wild Country or DMM. I will cover must-have sizes, easy placement and cleaning tips, smart racking methods, and when to add offsets or micro nuts.
Climbing nut set basics: what you get, how it holds, and when to use it
A climbing nut set starts with simple parts. The nut head forms a tapered metal wedge that jams into cracks. A thin wire cable connects to it via a swage, a crimp that joins everything securely. At the end sits a small ring for your carabiner.
These pieces make nuts passive pro. That means no springs or cams; they hold through shape and friction alone. Most sets include 6 to 10 nuts in sizes 1 through 10. Smaller ones fit tight spots, while larger ones grab wider cracks. Brands like Wild Country Rocks or DMM Wallnuts offer reliable options. You get light gear that weighs far less than cams, so it suits long days out.
In short, your first set gives versatile protection at low cost. Now let’s break down how they work.
How nuts actually hold in a crack (in plain English)
Nuts grip through constrictions, those bumps or narrowing spots in a crack. You push the nut head into the narrow end. Rock pinches the taper tight. A fall pulls it upward and outward. That wedges it deeper, like a key turning in a lock.
Direction of pull matters most. Climbers fall in a straight line from the nut. If that line angles right, the nut cams against the rock. Even a “small” nut turns strong here. Solid contact beats size every time. No wobble means it stays put.
Aim for full contact on three or four sides. Wobbling nuts shake loose under load. Instead, follow this quick mental checklist before you clip:
- Match the shape to the crack’s taper.
- Seat it by twisting or tapping gently.
- Tug down to confirm grip.
- Check the line of pull; it should run parallel to the crack.
Practice on plastic holds first. Soon, good placements feel intuitive.
Common nut shapes and why they feel different on rock
Shapes change how nuts bite. Classic tapered nuts narrow evenly on all sides. They slide into straight cracks smoothly. However, they may slip in flares.
Curved-face nuts add a bulge on one side and a scoop on the other. This creates three-point contact. They lock faster in shallow or tapered cracks. DMM Wallnuts use this design well. You feel the difference; they resist pulls better.
Offsets break symmetry. One side tapers steeper than the other. They shine in pin-scarred walls or flaring cracks. Black Diamond offers solid ones. Try them when parallel nuts wobble.
Each shape suits rock types. Granite favors curves because of its crystals. Sandstone likes offsets for soft edges. Pick a mix in your climbing nut set. Test them on routes to learn what sticks.
In addition, sculpted nuts place easy but clean harder. Boxier ones reverse that trade-off.
Nuts vs cams: when nuts are the better choice
Nuts beat cams on weight and price. A full set weighs half as much. You save hundreds of dollars too. Speed comes next; nuts place in seconds without fiddling lobes.
However, cams expand for parallel cracks. Nuts need taper. So choose based on route.
Nuts excel in these spots:
- Thin cracks where cams walk out under bounce.
- Icy or sandy cracks since passive design ignores grit.
- Long alpine routes for low weight over miles.
- Building anchors with multiples; they’re bomber stacked.
- Traverses or straight-in pulls where direction stays clean.
Cams win for speed in wide or horizontal features. Still, carry both for full coverage.
Nuts keep you light and protected on classic lines. They build skills cams skip.
Beginners, start with nuts. They teach crack reading. As a result, your trad game levels up fast.
How to pick your first climbing nut set without overthinking it
You want a climbing nut set that protects most routes right away. Start simple. Pick a full range of 10 nuts in sizes 1 through 10. This covers cracks from 5mm to 20mm wide. Most beginners need that spread for granite or sandstone.
Check ease of placement next. Curved shapes seat fast. Durability matters too; look for 12kN ratings and light alloy heads. Budget stays low at $80 to $100 for a solid set. Rock type guides you. Granite likes curves for crystals. Local crags test the rest. Brands like Black Diamond Stoppers, DMM Wallnuts, or Wild Country Rocks fit these needs well. Singles across the set work first. Add doubles later in mediums.
Start with a full set, then learn what sizes you actually place most
Grab 10 to 12 nuts as your baseline climbing nut set. Sizes 1 to 10 or 11 handle 90% of placements on average routes. Mediums like 4 through 8 see the most action. They fit typical cracks and get used 60% to 70% of the time. Tiny sizes 1 to 3 stay home at first. They suit thin seams but rarely lead climbs. Huge ones like 11 or 12 add weight without much gain early on.
Track your own use after a few trips. You might place size 6 ten times per pitch. Others sit unused. So buy one full set now. Double up on favorites later.
Used gear saves cash, but inspect closely. Check wires for frays or kinks; those fail under load. Avoid nuts with bent heads or deep grooves. Unknown history risks hidden cracks from drops. New sets from shops ensure strength. They last seasons anyway
In short, full sets build skills fast. You learn real needs on rock.
Which popular sets tend to work well for most climbers
Several sets stand out for new leaders. They balance range, weight, and grip without fuss. Personal fit and local rock often tip the choice. Test a few if you can.
Black Diamond Stoppers offer a straightforward pick. Their even taper bites most cracks. Climbers grab them for tough builds and solid holds.
DMM Wallnuts shine in odd shapes. Curved faces hug quirky flares or shallow spots. They place quick but may stick a bit.
Wild Country Rocks deliver classic reliability. Uniform curves pull clean, and value keeps costs down.
Local granite might favor one over others. Sandstone rewards curves more. Rack what feels right after practice.
Here’s a quick comparison of starter sets:
| Brand/Model | Sizes for Starter Set | Price Range | Key Strength | Drawback |
|---|---|---|---|---|
| DMM Wallnuts | 1-10 | ~$80 | Fits tapered cracks well | Sticks in some rock |
| Wild Country Rocks | 1-10 | ~$80 | Easy to place and remove | Basic shape |
| Black Diamond Stoppers | 1-10 | ~$80-100 | Durable all-rounder | Less curve |
All weigh under 400g total. Ratings hover at 4.8 to 5 stars. Pick based on your crag.
Choosing sizes: what “small, medium, large” really means on a rack
Small nuts like sizes 1 to 4 squeeze into thin seams. They protect finger cracks where cams fail. Use them sparingly at first.
Mediums, sizes 5 to 8, rule most racks. Parallel constrictions love them. Data shows 60% to 70% of placements hit this range on multipitch. They balance weight and reach.
Large ones, 9 to 11 or 12, grab wider spots. Horizontal breaks or big flares need them. However, they weigh more, so carry fewer.
Start with singles across 1 to 10. Experience shows mediums get repeats. Add doubles there first. Big sizes rarely double up.
This split covers routes without overload. Adjust as you climb.
How to place nuts that feel bomber, not sketchy
Your climbing nut set shines when placements feel solid. A bomber nut grips tight and inspires trust. Sketchy ones wobble or slip, so focus on constrictions and contact. Good technique turns average cracks into safe pro. You build this skill fast with practice. Let’s break it down.
A step-by-step placement routine you can repeat every time
Repeat this process each time. It keeps things simple and safe. Start by scanning the crack for a constriction, a spot that narrows downward. Skip smooth parallels; they won’t hold.
Next, pick the right size from your rack. Grab the nut by the wire. Slide the tapered head into the wider top of the constriction. Use a firm hand to push it down until rock pinches all sides.
Seat it with a quick tug downward. Twist gently if needed for flush contact. Evaluate now. A good placement feels stable; it doesn’t rock or shift. Gently weight it in the fall direction. No slide means it’s bomber.
Finally, extend with a quickdraw or alpine draw. This keeps the rope straight and stops the nut from lifting out. Clip and climb on.
Here’s the routine in order:
- Spot the constriction that tapers down.
- Choose size to match the narrow end snugly.
- Place with firm push into the taper.
- Seat and tug for no wobble.
- Check contact on three or four sides.
- Extend the sling to manage pull.
Practice this on toprope first. Soon, bomber nuts become second nature. In addition, always think about your second cleaning it easily
Mistakes beginners make with nuts, and how to fix them
Beginners often rush placements. However, small fixes turn sketchy pro bomber. You can avoid these pitfalls and climb safer.
Common issues include placing in parallel cracks without constriction. Nuts slip here because nothing wedges them. Fix it by moving up or down to find a taper. Patience pays off.
Placing too shallow leaves wires exposed and the nut loose. Push deeper until the head sits flush. Rock must hug the taper fully.
Wrong orientation kills grip. Don’t force skinny sides into wide spots; rotate for max contact. Wide faces against rock work best.
Ignore the line of pull, and the nut blows out. Match your clip so fall force cams it deeper. Test by bouncing the rope lightly.
Over-camming happens when you yank sideways hard. That twists it wrong. Instead, tug straight down.
Leaving it unextended lets rope drag walk it free. Always add a draw. Your climbing nut set lasts longer this way.
Most importantly, stay encouraged. Everyone starts shaky. Practice on low routes. Watch partners place nuts. Soon, you spot good spots quick.
Special situations: flares, shallow cracks, pin scars, and icy rock
Tricky cracks test your climbing nut set. However, smart choices work. Know when to adapt or skip nuts.
In flares, where cracks widen up, regular nuts slip. Offsets fix this. Their uneven taper grabs irregular rock. Place the steep side into the narrow pinch.
Shallow cracks demand small sizes or endwise placement. Skinny sides fit flush. However, test extra; they hold less. Try a bigger nut lower if possible.
Pin scars leave uneven pits. Offsets shine here too. They bridge the damage for solid contact. Regular nuts often wobble.
On icy rock, clear ice first. Nuts need clean constrictions. Bigger sizes grip better, but cams might suit sandy or wet spots more. Go slow and tug firm.
Micro nuts and brassies help in tiny seams. They demand skill, though. Assess rock carefully; loose flakes kill them. Add these to your set later.
Offsets expand your options without much weight.
For example, carry a few offsets with your standard nuts. They save runs outs on mixed routes. As a result, you climb varied terrain confidently.
Racking and carrying a climbing nut set so you can place gear fast
Fast placements save energy on lead. A well-racked climbing nut set lets you grab the right size without looking down. You stay pumped and focused. Most climbers use a gear sling for this. It keeps nuts handy over your shoulder. However, harness loops work too for short routes.
Start simple with one or two carabiners. Split sizes to find pieces quick. In addition, keylock wiregates stop snags on rock or slings. Overload kills speed, so limit each biner to 10 nuts max. Rack nuts with cams and cords for balance. Practice your setup at home. Then it flows on real leads.
One carabiner vs two: the simple system most climbers start with
New leaders often pick two carabiners as default. Clip small nuts (sizes 1-5) on one. Put mediums and larges (6-10) on the other. This split matches common cracks. You reach smalls for tips, larges for hands. Keylock wiregates face out. They reduce snags on sleeves or slings. As a result, nuts slide smooth when you grab.
One carabiner suits light racks. Group all mediums (4-9) together. However, it limits doubles. Cram no more than 10-12 pieces per biner. Otherwise, they jam. You waste time digging. Two biners prevent this. They keep your climbing nut set organized even with extras.
Gear slings hold biners best. Rear harness loops avoid hip swing. For example, left biner for smalls stays out of reach. Right one sits perfect for pump. Test both setups on easy leads. Two biners win for most.
How to sort nuts so you can find the right one mid-pump
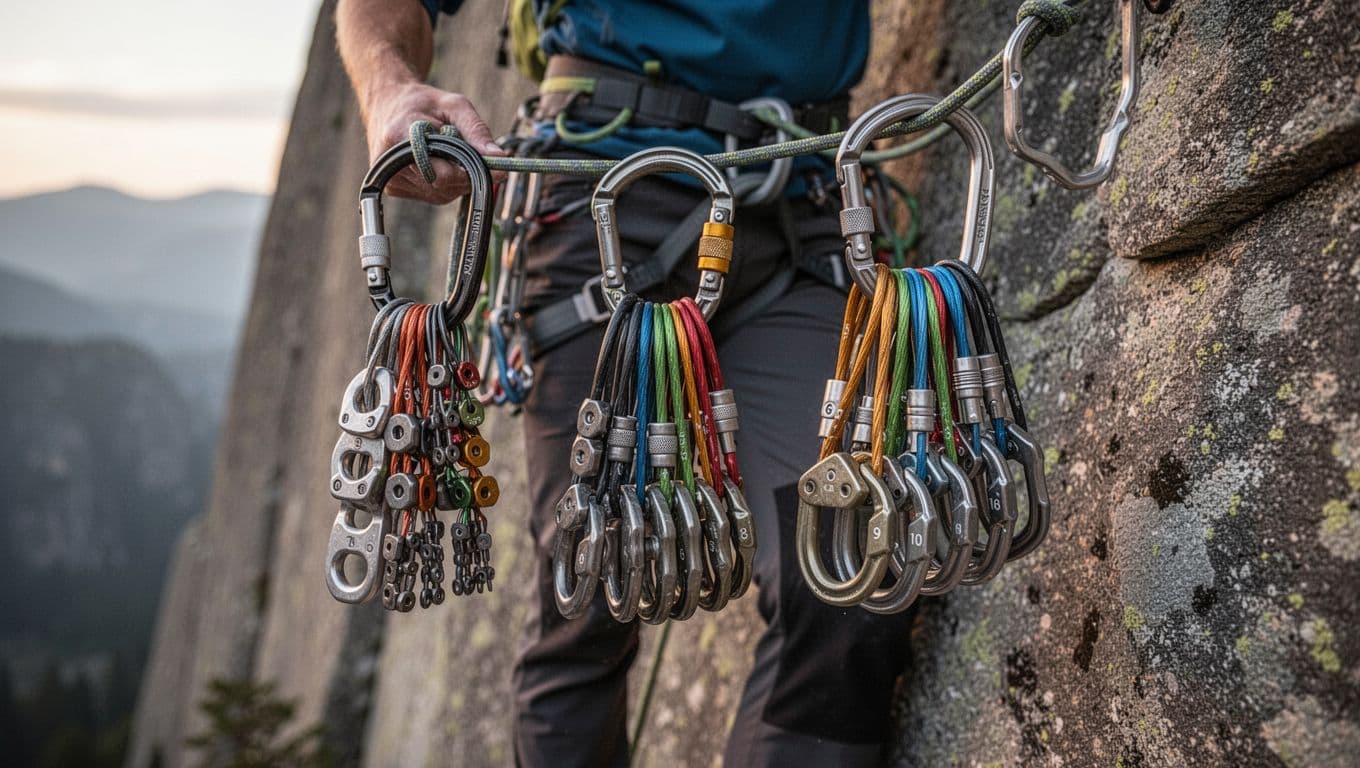
Sort by size first. Smallest at top or left, largest at bottom or right. Labels face out always. You spot #6 without flipping. Colors help too. Brands code them: black or gold for smalls, silver or blue for mediums, green or red for larges. Consistency beats perfection. Rack the same way every trip. Muscle memory kicks in mid-route.
On two biners, smalls stack neat on left. Wires stay parallel. Doubles go below singles. For example, extra #6 sits under the main one. Offsets get their spot nearby. They fit flares well. Practice blind grabs at home. Soon, you snag the right nut fast.
Mix with cams next. Nuts on one sling side, cams opposite. Cords or alpines clip low. This balances weight. Your climbing nut set stays quiet. No clank distracts you.
Keeping the rack quiet and clean on long routes
Wires tangle easy if crossed. Sort tight by size. Curved sides face out. Short wires go first. They won’t loop over longs. Avoid twists in the bundle. Clip gates the same way each time. After each placement, stow the used nut cable-up on the biner. It prevents clusters at cruxes.
Reset at pitch ends. Unclip all, sort fresh. Neat racks last multipitch. On alpine routes, cut extra biners. Use one Dyneema sling total. Key pieces sit front-center. Partner splits the load: you take smalls, they grab larges. Quickdraw nuts for less drag.
Light wax on wires smooths slides. Check kinks pre-climb. Clean racks boost speed. You place bomber nuts without pause.
Taking care of your nut set and knowing when to upgrade your rack
Your climbing nut set lasts years with basic care. However, neglect leads to failure. Check it often, clean after wet days, and know when to retire pieces or expand. This keeps you safe and saves money. Start with quick inspections. Then add gear only as needs arise. Most new leaders follow a simple path that builds skills step by step.
Quick safety checks before and after a day of climbing
Inspect your climbing nut set before each climb and after. Hands-on checks spot issues fast. Look at the wires first. Frayed or kinked cables weaken under load, so retire them right away. Bent strands or loose swages mean the same.
Next, check nut heads. Sharp burrs cut ropes; deep grooves signal heavy use. Dents, cracks, or bends deform the taper. After falls, test stability in a crack. Wobbly pieces go in the trash.
Corrosion rusts metal over time. Salt from sea cliffs speeds it up. Clean dirt and grit with mild soap and water. Rinse well, then air dry fully. Wipe heads with a soft cloth. Light dry lube on wires helps them slide, but skip oily stuff like WD-40. It grabs more dirt.
Store dry in a gear bag away from sun. Use a nut tool to clean placements. It saves wire wear. In short, these habits extend life.
Retire any doubt. When in doubt, toss it out.
When it’s time to add micro nuts, offsets, or doubles
Experience shows when to grow your rack. You hit limits on real routes. So add smart, not all at once.
Can’t protect thin seams? Micro nuts fit sizes below #1. They grab finger cracks where standards fail. Start with two to four pieces after 10 to 20 leads.
Flares or pin scars reject regular nuts. Offsets bridge them with uneven tapers. Carry four to six once standards feel easy. They open flared granite or scarred walls.
Run out of mediums like #4 to #8? Doubles there first. Long pitches or anchors eat them. However, skip extras until you track actual use.
These triggers keep your climbing nut set light. Buy quality; cheap wires snap.
A realistic first rack path for most new trad leaders
New trad leaders build racks over time. Rush it, and you waste cash. Focus on decisions from your climbs.
Buy one full climbing nut set first, sizes #1 to #10 or #11. It covers easy 5.6 to 5.7 routes. Practice placements on low angles. Learn what sticks.
Add a nut tool next, with a leash. It cleans gear without drops. Lead short pitches now. Borrow cams from friends for wide spots.
After 10 to 20 leads, note gaps. Thin cracks? Grab two micro nuts. Popular mediums empty fast? Double #4 to #8. Flares everywhere? Four offsets join the sling.
Here’s a simple first-year path:
- Month 1: Full nut set + nut tool. Lead easy singles.
- Months 2-3: Add three small hexes or cams for variety.
- Months 4-6: Micros and medium doubles for longer routes.
- Months 7-12: Offsets and more cams as skills grow.
Track placements in a notebook. Sell unused gear. Partner up to share loads. This path matches most climbers. You end with a versatile rack under $300 total.
Conclusion
You now know how to build a solid climbing nut set that matches your routes. Start with a full range from sizes 1 to 10, like Black Diamond Stoppers or DMM Wallnuts. Focus on smart sizing so mediums handle most cracks. Then master that repeatable placement routine: spot constrictions, push firm, tug to seat, and extend every time. Clean racking on two carabiners keeps you fast mid-pitch. Finally, upgrade gradually with micros or offsets as gaps show up on real leads.
These steps turn nuts from basic gear into reliable protection. You climb lighter and bolder without sketchy spots.
Grab your climbing nut set for the next outing. First, practice placements at ground level on boulders. Inspect wires and heads closely. Rack smalls left, larges right, every trip. Lead that easy trad pitch. You’ll feel the difference right away.
Back to Climbing Nut Reviews
Recommended Products for Sport Climbing
These products can support safer climbing, belaying, rappelling, and emergency readiness.
Affiliate disclosure: As an Amazon Associate, TradClimbers may earn from qualifying purchases at no additional cost to you.
Keep exploring helpful trad climbing, gear, safety, and technique resources.
- A Climber’s Guide to Rock Climbing in Thailand
- A Trad Climber’s Guide to the Isle of Skye Ridge
- Hueco Tanks Rock Climbing: hueco tanks rock climbing Essentials
- A Climber’s Guide to The Nose of El Capitan
- The Top 8 Unforgettable Climbing Routes El Capitan Has to Offer in 2026
- Yoga for Climbers: Boost Strength, Flexibility, and Recovery | yoga for climbers