

You’ve probably eyed those narrow cracks on your next trad lead and wondered how to protect them. Black Diamond Stoppers solve that. They’re passive protection: simple aluminum wedges on a steel cable that jam into rock cracks and hold firm under load.
Cams dominate wider spots, but stoppers shine elsewhere. They’re lightweight, so you carry more without fatigue. Plus, they’re reliable with no moving parts, cheaper than cams, and perfect for tight parallel cracks or seams where cams flop.
In this post, you’ll learn the differences between standard stoppers, micro stoppers for tiny features, and offsets for flared or irregular cracks. We’ll cover how to pick the right sizes, build a smart rack, and place them securely. You’ll also get tips on cleaning them safely, so you build confidence on lead.
Whether you’re a newer trad climber or refreshing old skills, these basics keep you protected. Let’s get into it.
What Black Diamond Stoppers are and how they hold a fall
Black Diamond Stoppers offer passive protection. They work as simple aluminum wedges on a durable galvanized steel cable. You tuck the tapered head into a crack constriction. When you fall, the load pulls it in tighter, so friction binds it to the rock.
These pieces feature a transverse taper. That means the narrow side fits parallel cracks, while you rotate them for flares. Colors code each size for quick grabs from your rack. Smaller ones have straighter edges; larger show rounded corners for easy pulls. Ratings drop on tiny sizes, so some handle body weight only during aid climbing.
Picture a doorstop under a door. You pull on the cable, and the wedge cams deeper. Load direction matters most. It bites when force runs perpendicular to the crack walls. Cables flex to follow that path.
The simple physics, why a wedge gets tighter when you pull
Cracks often narrow at spots called constrictions. You seek three or four solid contact points there. The taper matches the pinch, so the stopper nests snug.
Pull on the cable. Friction converts motion to grip. The wedge shape forces it deeper into the tight spot. A good placement resists twists or wiggles. Test by yanking sideways; it should stay firm.
Expected pull direction runs straight down from the piece. That aligns force into the constriction. However, rope drag changes things. Your rope snakes over features below. It tugs the stopper at odd angles. For example, a sharp roof pull might flip it outward. Always visualize your fall path first. Place accordingly.
In short, physics favors snug fits in the right spots.
Standard vs offset vs micro, what each is built for
Black Diamond builds three main stopper families. Each targets specific cracks. Choose based on what you climb.
Standard Stoppers range from sizes 1 to 13. They handle most parallel-sided cracks and seams. The smallest, like #1 and #2, often serve aid duties only because of low ratings. You grab these for runout pitches or vertical seams.
Offset Stoppers, typically sizes 7 to 11, fix irregular shapes. One face protrudes more than the other. This bites into flares or pin scars where walls don’t align. Rotate them to match the odd geometry. They shine in old aid routes or granite features.
Micro Stoppers tackle tiny placements. Their copper-infiltrated iron heads add bite in shallow pods or hairlines. Standard micros remain available, but offset micro versions got discontinued as of February 2026. Shoppers now find mostly standard options for the smallest cracks.
Consider your terrain. Standards cover basics. Offsets save tricky spots. Micros extend reach into micro-cracks.
Where stoppers shine compared to cams
Stoppers beat cams in tight, finicky cracks. Cams need room to expand lobes. Stoppers slip into shallower spots.
You place them in shallow seams under roofs. Tiny pods take micros where cams walk. Constrictions in granite hold standards tight. Icy cracks resist too; lobes slip on frozen surfaces, but wedges grip.
Sandy cracks pose issues for cams. Gears gum up. Stoppers push through loose grains. Long pitches favor their light weight. You rack doubles without overload.
Here are prime examples:
- Horizontal seams in sandstone, too thin for small cams.
- Parallel-sided quartz veins on big walls.
- Snow-filled alpine cracks, where ice blocks lobe bite.
Besides, no springs mean less fuss in runouts. Rack them for versatility.
How to place Black Diamond Stoppers with confidence
You spot a crack on lead. Now place your Black Diamond Stoppers right the first time. Good placements build trust fast. Follow simple steps: pick the crack, choose size and fit, seat it snug, then test. This PCGI check covers rock quality, constriction, gear direction, and contact points. Practice builds speed. In good rock, these hold big falls.
Start close. Scan for the right feature. Then work the nut in by hand. Tug to confirm. You’ll clip with peace of mind.
Finding the best crack shape, constrictions, flares, and tiny seams
Eyes lead first. Look for cracks that taper down. Wider mouths with tight bottoms hold best. Skip wide-open flares or straight parallels. Those slip under load.
Run your fingers next. Feel for solid rock. Probe the shape. A good constriction pinches uniform. Flares widen out; match them later with offsets. Pin scars show old drill marks. Offsets grab those uneven spots better. Standards shine in clean, parallel constrictions because they predict easy.
Tiny seams suit micros. Check depth too. Shallow ones need precise fits. Test firmness. Loose flakes crumble; pass them by.
Choose size by eye first. Grab one that matches the narrow end. Try two orientations. Wide sides out for max grip. Flip if needed.
Placing, setting, and checking your work (the 10-second test)
Pick your size. Slot the narrow end into the constriction. Rotate for best fit. Seat it by hand. Give a light tap with your palm. Feel it nest.
Keep the cable straight. Avoid sharp bends over edges. Those weaken hold. Align for your pull direction: down and out from the wall.
Tug now. Yank in the fall path. Upward first, then sideways. Solid contact on three points means good. No wobble. Skip single-edge rests; they pop.
That’s your 10-second test. Re-check after you pass. Weight shifts things.
Clip quick. Use short draws to cut drag. Extend if rope zigzags below.
Common placement mistakes that lead to bad gear
Bad spots kill confidence. Stay safe by spotting these first.
Avoid parallel cracks without pinch points. No taper means no bite. Pass hollow flakes too. They flex and fail.
Don’t overcam. Hammer too hard, and it sticks for your second. Tiny aid sizes hold body weight. Never trust them for lead falls.
Ignore rope drag at your risk. It twists pull direction. Visualize your line. Place to match.
Here are key pitfalls to dodge:
- No constriction: Straight walls eject the nut.
- Flakes or loose rock: Test with a poke.
- Over-set nuts: Clean fails later.
- Wrong tiny sizes: Check ratings first.
- Bad angles from drag: Extend placements.
Slow down. Safety wins every clip.
Making offset and micro placements work (without overtrusting them)
Offsets fix flares and scars. One face sticks out more. Rotate to bite the wide side. Walk it in with small twists. Use crystals or ripples for extra grip.
Micros pack copper edges for slick rock. They grab hairlines. Still, back them up. Slick granite limits hold. Place a standard nearby if doubt hits.
Work them gentle. Tiny motions seat best. Test twice. Honest eyes spot weak spots.
Before you clip, run this quick checklist: Solid rock? Good constriction? Pull direction matches? Three contacts firm? If yes, go. Practice on toprope. You’ll place Black Diamond Stoppers like pros soon.
Picking the right Black Diamond Stopper set for your rack and budget
You don’t need a huge rack of Black Diamond Stoppers to start. Most new trad leaders build smart with 10 to 15 pieces. Begin with a standard set like sizes #4 to #13. That covers common cracks for about $145 as of early 2026, though prices shift. Check the Black Diamond site or spots like REI for deals. Add a few extras later. Singles work fine at first. Doubles mean two of one size, so you place one higher without running out. You really need just eight to ten nuts for local crags. Expand as routes demand. Offsets and micros come next if your rock calls for them.
The starter rack approach, what most new trad leaders actually use
New trad climbers grab a standard Black Diamond Stoppers set first. Go for #4 through #13. It fits most granite or limestone seams. That’s your core. Add doubles in sizes #6 gold, #7 green, and #8 blue. Those mid-sizes protect 80 percent of cracks.
Why doubles? You place one low, then another up high. No gap in pro. Ask your local partners which sizes they use most. They know the rock. For example, Smith Rock favors #5 to #9. Index might need #7 to #10.
Keep it light. Ten to twelve pieces total. Rack them on gear loops by color. You’ll climb without overload. As a result, confidence grows fast.
When offsets are worth it (and when they are not)
Offsets shine in uneven cracks. Grab Black Diamond Offset Stoppers #7 to #11 for about $20 each, or $75 to $100 for a set. Prices vary, so shop around.
Use them in flared cracks where one wall bells out. Pin scars from old bolts take the protruding face. Weird pods or solution pockets fit too. Sandstone often flares more than granite, so offsets help there. Granite stays parallel, so standards rule.
However, beginners find offsets tricky. They rotate odd. Practice on toprope first. Use conservative judgment. Place one, test hard, back it with a cam if unsure.
Skip offsets for clean parallels. Standards nest better. In short, match your terrain.
Do you need micro stoppers, and which sizes are realistic for free climbing
Micro Black Diamond Stoppers extend your reach into tiny seams. Larger ones like #4 bronze, #5 silver, and #6 gold hold free climbs. They rate higher and bite shallow pods.
Tiny sizes #1 to #3 manage body weight only. Save those for aid or aid practice. Never lead off them alone.
Buy a micro set for $80 to $100 if hairlines appear often. Back them up always. Understand ratings: check Black Diamond specs. A #6 pulls 10 kN; #1 just 4 kN.
For free climbing, stick to bigger micros. Pair with standards. Test twice. Solid rock makes them shine.
Care, inspection, and cleaning tips so your stoppers last for years
Your Black Diamond Stoppers deserve attention after every climb. Proper care keeps them reliable for seasons. Galvanized steel cables resist rust well, but wet gear invites problems. Always rinse off dirt, salt air, or moisture right after use. Store them dry and loose in a gear bag, away from sun and heat. That simple routine extends their life. In addition, inspect before each outing. Check cables for frays or kinks. Look at heads for dents or grooves. Retire anything suspect. No set lifespan exists, so damage rules the call. Follow these steps, and your rack stays solid.
How to clean a stuck nut without wrecking the cable or the rock
Stuck Black Diamond Stoppers happen, especially if you over-set them. Rounded edges on larger sizes help them release easier. Still, patience wins every time. Grab a nut tool first. Hook its curved end into the narrow slot at the back of the stopper head.
Tap gently from behind. Use a small hammer or your palm. That shifts the wedge without yanking the cable. Cables snag on rock otherwise, and pulls damage them fast. Change direction next. Wiggle the tool side to side. Work it free bit by bit.
After you pull it out, rinse with fresh water. Brush off grit softly. Wipe everything dry. Avoid chemicals; they weaken metal. As a result, your stoppers stay smooth and ready.
Quick inspection checklist and retirement red flags
Inspect your Black Diamond Stoppers before every climb. Hold each one close. Compare to a new piece if you have one. Spot issues early, and retire without doubt.
Here are the main red flags. Check these fast:
- Broken wire strands on the cable; frays mean weakness.
- Severe kinks or stiffness; they cut strength.
- Crushed or deformed heads; flat spots fail to grip.
- Sharp burrs on edges; they snag rock or cables.
- Loose swage where cable meets head; separation risks disaster.
- Any piece in a big fall or heavy abrasion; history matters.
Rust pits count too. Deep grooves or cracks end a stoppers life. Faded colors signal wear. Pros retire gear quicker with hard use.
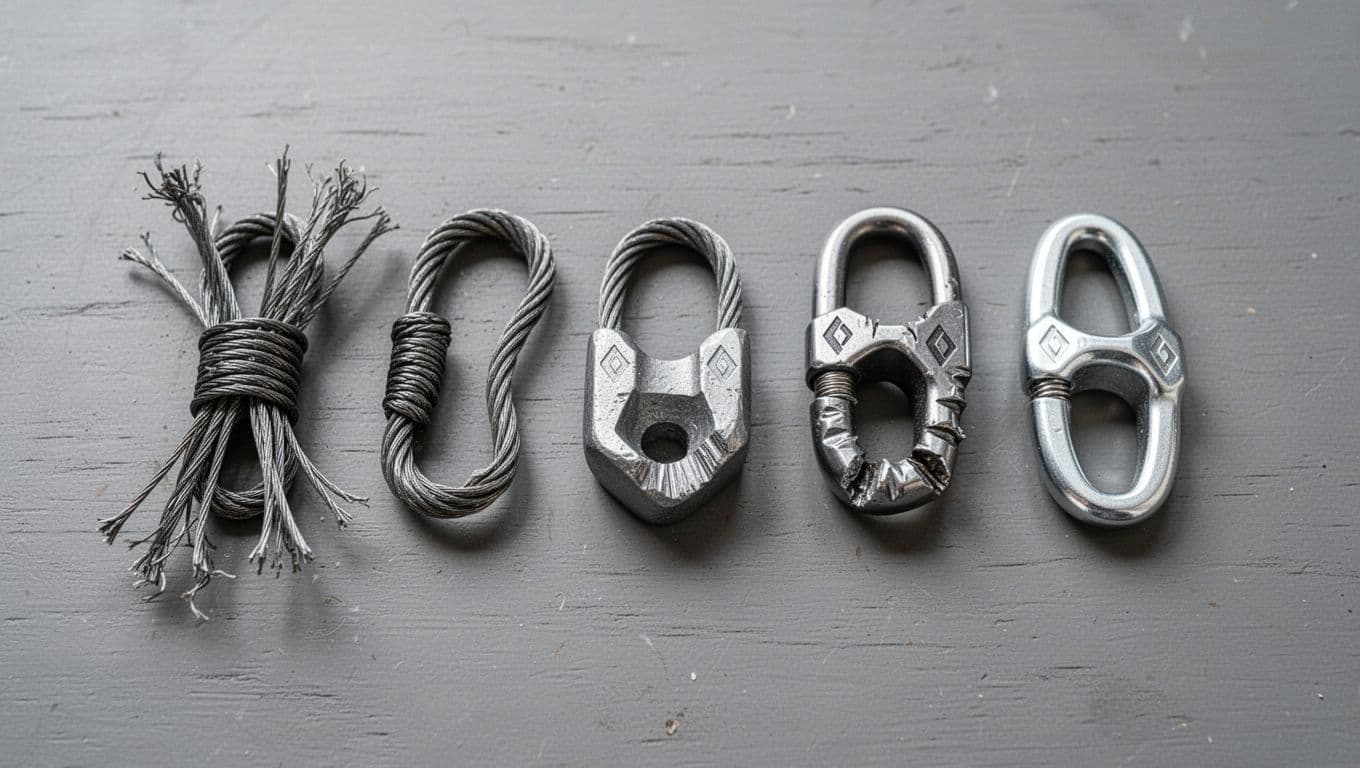
Cut retired ones apart. That stops reuse by mistake. In short, safe habits build long-term trust in your rack.
Conclusion
Black Diamond Stoppers deliver reliable passive protection through simple wedge physics. You tuck them into constrictions, and they grip tighter under pull. Standards handle parallels, offsets fix flares, and micros grab tiny seams. Place them right by finding solid spots, seating snug, and running the 10-second test for three firm contacts.
Start your rack with sizes 4 to 13 for most cracks. Add doubles in midsizes like 6 to 8. Inspect cables and heads often. Clean stuck ones with a nut tool, and retire damaged gear fast.
Safety comes first, so build skills step by step. Practice placements on boulders at ground level. Mock up anchors to test holds. Always carry a nut tool. Back up small or offset pieces with cams until confidence grows. You’ll protect runs soon. Grab your set, hit the crags, and climb secure.
Back to Climbing Nut Reviews
Recommended Trad Protection and Rack Essentials
These products can support safer climbing, belaying, rappelling, and emergency readiness.
Affiliate disclosure: As an Amazon Associate, TradClimbers may earn from qualifying purchases at no additional cost to you.
Keep exploring helpful trad climbing, gear, safety, and technique resources.
- A Climber’s Guide to Rock Climbing in Thailand
- A Trad Climber’s Guide to the Isle of Skye Ridge
- Hueco Tanks Rock Climbing: hueco tanks rock climbing Essentials
- A Climber’s Guide to The Nose of El Capitan
- The Top 8 Unforgettable Climbing Routes El Capitan Has to Offer in 2026
- Yoga for Climbers: Boost Strength, Flexibility, and Recovery | yoga for climbers